tl;dr? wp-k8s (Github)
Title of this blog post isn’t a collection of every Kubernetes related buzzword I could think of. It’s a collection of technologies that went into creating an automated, resilient and scalable WordPress setup.
If you’re interested in private cloud implementation please refer to: wp-k8s: WordPress on privately hosted Kubernetes cluster (Raspberry Pi 4 + Synology).
Cost of maintenance with traditional infra
Few years ago I created containerized-wordpress-project which allows you to Automagically deploy & run containerized WordPress (PHP7 FPM, Nginx, MariaDB) using Ansible + Docker on AWS. Project was a success since I know about couple of big (tech) companies that are using it as part of their deployments and it also lead to some fruitful collaborations.
Before migrating to setup I’m describing in this post, this very site was running on “containerized-wordpress-project” for years without a single major issue. However, while perfectly stable it wasn’t perfect because of its aging technology stack. It didn’t have an orchestrator, and if one of the containers crashed it would remain in that state until I manually started it back up. Same case was with periodically having to SSH to the VM and restart one of the containers for it to fetch new Let’s Encrypt certificate before old one expires, or to pull latest system updates.

Most importantly, if there was a huge spike in traffic because one of your projects ends up as number 1 on Hacker News, followed by same type of response on Twitter. Your site won’t go down under the load and you won’t have to have to manually trigger scale up of existing hardware/VM’s and then scale it back down when traffic is back to its regular levels.
That’s how wp-k8s project was born. WordPress on Kubernetes setup which resolves all of the above mentioned problems.
wp-k8s: WordPress on Kubernetes project
wp-k8s (Github) consists of (WordPress) Kubernetes deployments setup which is made to be resilient and scalable, utilizing automation without need for maintenance. In situation of load increase, more pods and nodes would be added to the cluster, After the load is back to optimal levels, additional pods and nodes will be removed.
Please note while wp-k8s project is compatible with any Kubernetes/cloud provider, in this post I’ll focus on deploying it to Google Kubernetes Engine (GKE) as part of Google Cloud Platform (GCP).
Brief overview of what this setup consist of:
- Google Kubernetes Engine (GKE) cluster enabled with cluster-autoscaler & native VPC
- Cloud SQL MySQL wordpress database
- Persistent storage using GCE Persistent Disk
- NFS Server which will store data to our Persistent storage
Please note! Instead of using NFS server, alternatively WP-Stateless WordPress plugin can be used, where media will be served from Google Cloud Storage bucket instead. See wp-k8s Github ReadMe for more details! - WordPress deployment which will write data to MySQL WordPress database
- cert-manager which will automatically issue and renew Let’s Encrypt certificate to have secure HTTPS access to our WordPress deployment
- ingress with ingress-nginx controller which will serve as our load balancer. This will be our only entry point to our cluster from outside world on port 443 (any traffic on port 80 will be redirected to 443).
- VPA – enables Vertical Pod Autoscaler in
UpdateMode: Offmode, which instead vertically scaling our deployments will give recommendations on type of resources are deployments are using. Which will help us set more realisticresourcestype. Which will help HPA/metrics server make better auto scaling calculations and decision. - HPA – enables Horizontal Pod Autoscaler, which will scale our pods to desired number to reduce/balance the load. In case our pods need more system resources to deploy new pods, cluster-autoscaler will step in and provision and new nodes to our cluster.
Each component explained in detailed along with design decisions can be found in sections below.

In diagram above cluster as it is in its “start state” when its first deployed without any traffic/load, where it consists of minimum number of pods and a single node. Please note diagram has been deliberately simplified and is purposely missing some low level details.
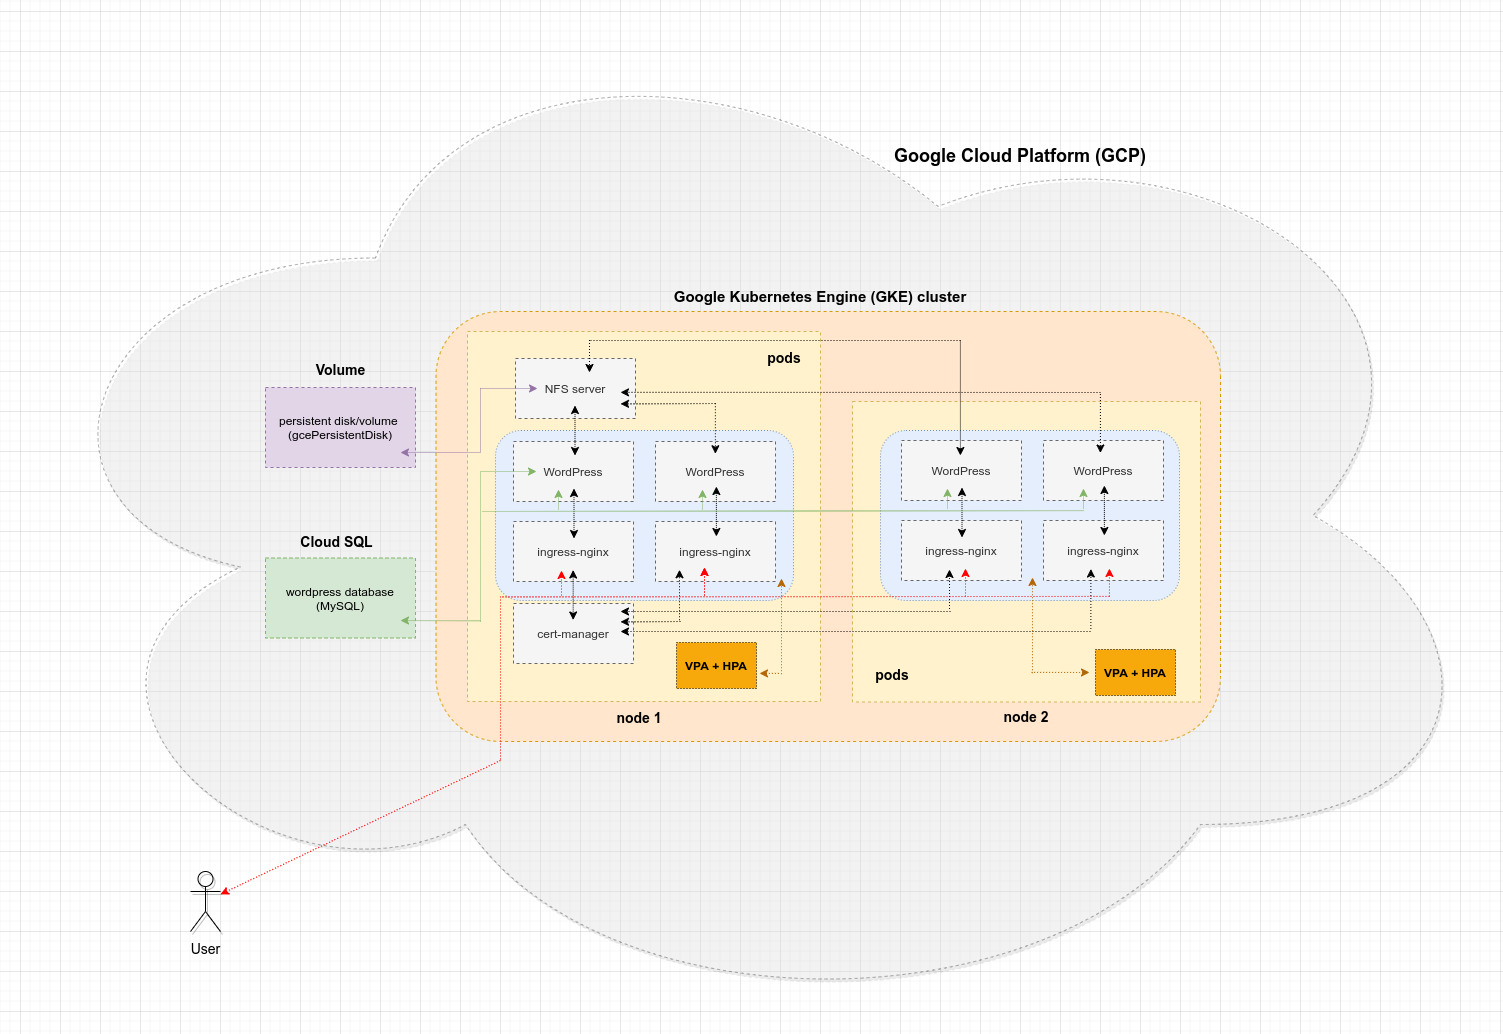
In diagram above cluster is in it “autoscaled” state. It depicts a state in which it met conditions for CPU/Memory utilization defined in our HPA and has spawned 2 additional WordPress and 2 additional Ingress pods (4 total). When cluster detects more resources are needed for pods, more nodes will be added to the cluster.
Step 1: Provision GKE cluster with cluster-autoscaler & native VPC
Pre-requisites:
- Cloned contents of wp-k8s repo, i.e:
git clone https://github.com/AdnanHodzic/wp-k8s.git - Google CloudPlatform (GCP) account
- A sub/domain name with access to edit its DNS records
- gcloud, kubectl, helm CLI tool
- You’ll need to login which can be done running:
gcloud auth login
After which you can proceed to create the GKE cluster:
gcloud container clusters create wp-k8s \
  --zone europe-west4-a \
  --machine-type e2-small \
  --disk-size 10 \
  --enable-autoscaling \
  --enable-vertical-pod-autoscaling \
  --num-nodes 1 \
  --min-nodes 1 \
  --max-nodes 2 \
  --enable-ip-alias \
  --create-subnetwork name="" \
  --no-enable-cloud-logging
Further information about Step 1
gcloud container clusters create wp-k8swill create cluster called: wp-k8s--zone europe-west4-aI’ve selected a single zone cluster located in Netherlands. Depending on required availability for your workload, in unlikely case this whole zone went down so would your site. Hence you might be interested in using--regionoption, which would then be spread across 3 or more zones. Of course this option will incur more costs. See GCP Regions and zones page for more info.-
--machine-type e2-smallSets for nodes to bee2-smallwhich is an instance with 2 vCPU’s (2000milicores) and 2GB of RAM, which will cost 11,53€/13.42$ a month. More details on Machine types/families, --disk-size 10default size is 100GB, which will also come with a higher price tag. Used as node VM boot disksenable-autoscalingenables autoscaling for a node pool (cluster autoscaling).enable-vertical-pod-autoscalingenable vertical pod autoscaling for a cluster.num-nodes 1the number of nodes to be created in each of the cluster’s zones. I went with number 1 to keep the costs at minimum.min-nodes 1minimum number of nodes per zone in the node pool.max-nodes 2maximum number of nodes per zone in the node pool.enable-ip-aliascreates a VPC native cluster. This option will be necessary to have internal communication to our MySQL database.create-subnetwork name=""will create a private IP range for you.no-enable-cloud-loggingdisables Legacy Logging and Monitoring/Cloud Monitoring and Cloud Logging. In our case this will only incur an unnecessary casts, while we’ll still be able to get basic monitoring.
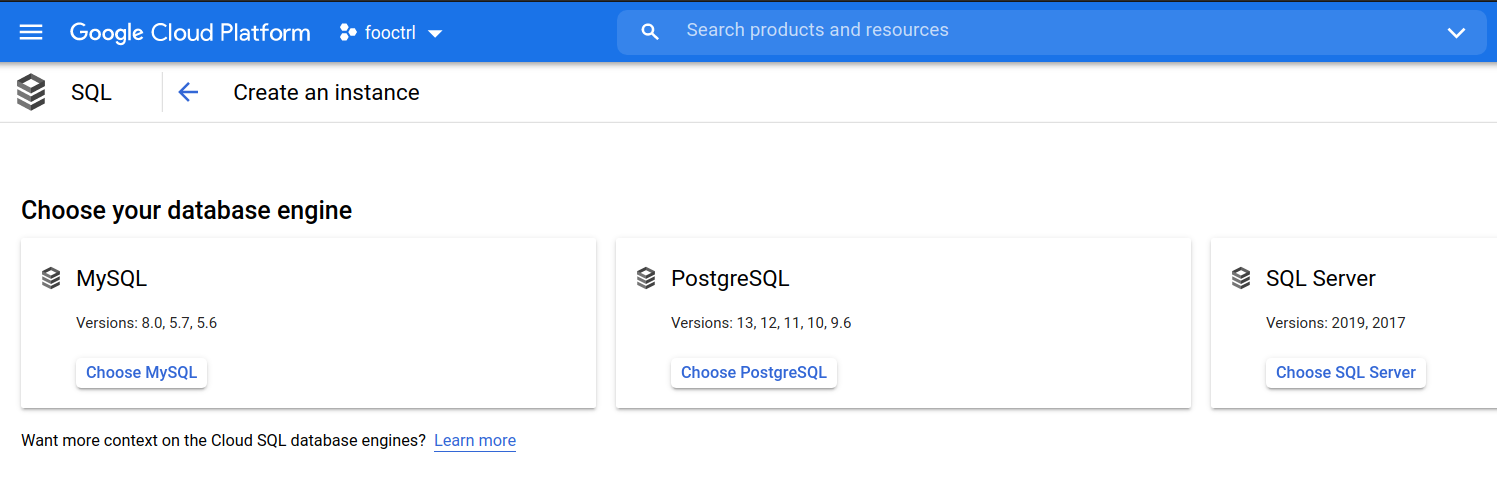
Step 2: Cloud SQL (MySQL WordPress database)
WordPress needs a MySQL database, in this setup we’ll create that database as part of Cloud SQL. In SQL section of GCP, click on create “Create an instance” and select “MySQL”.
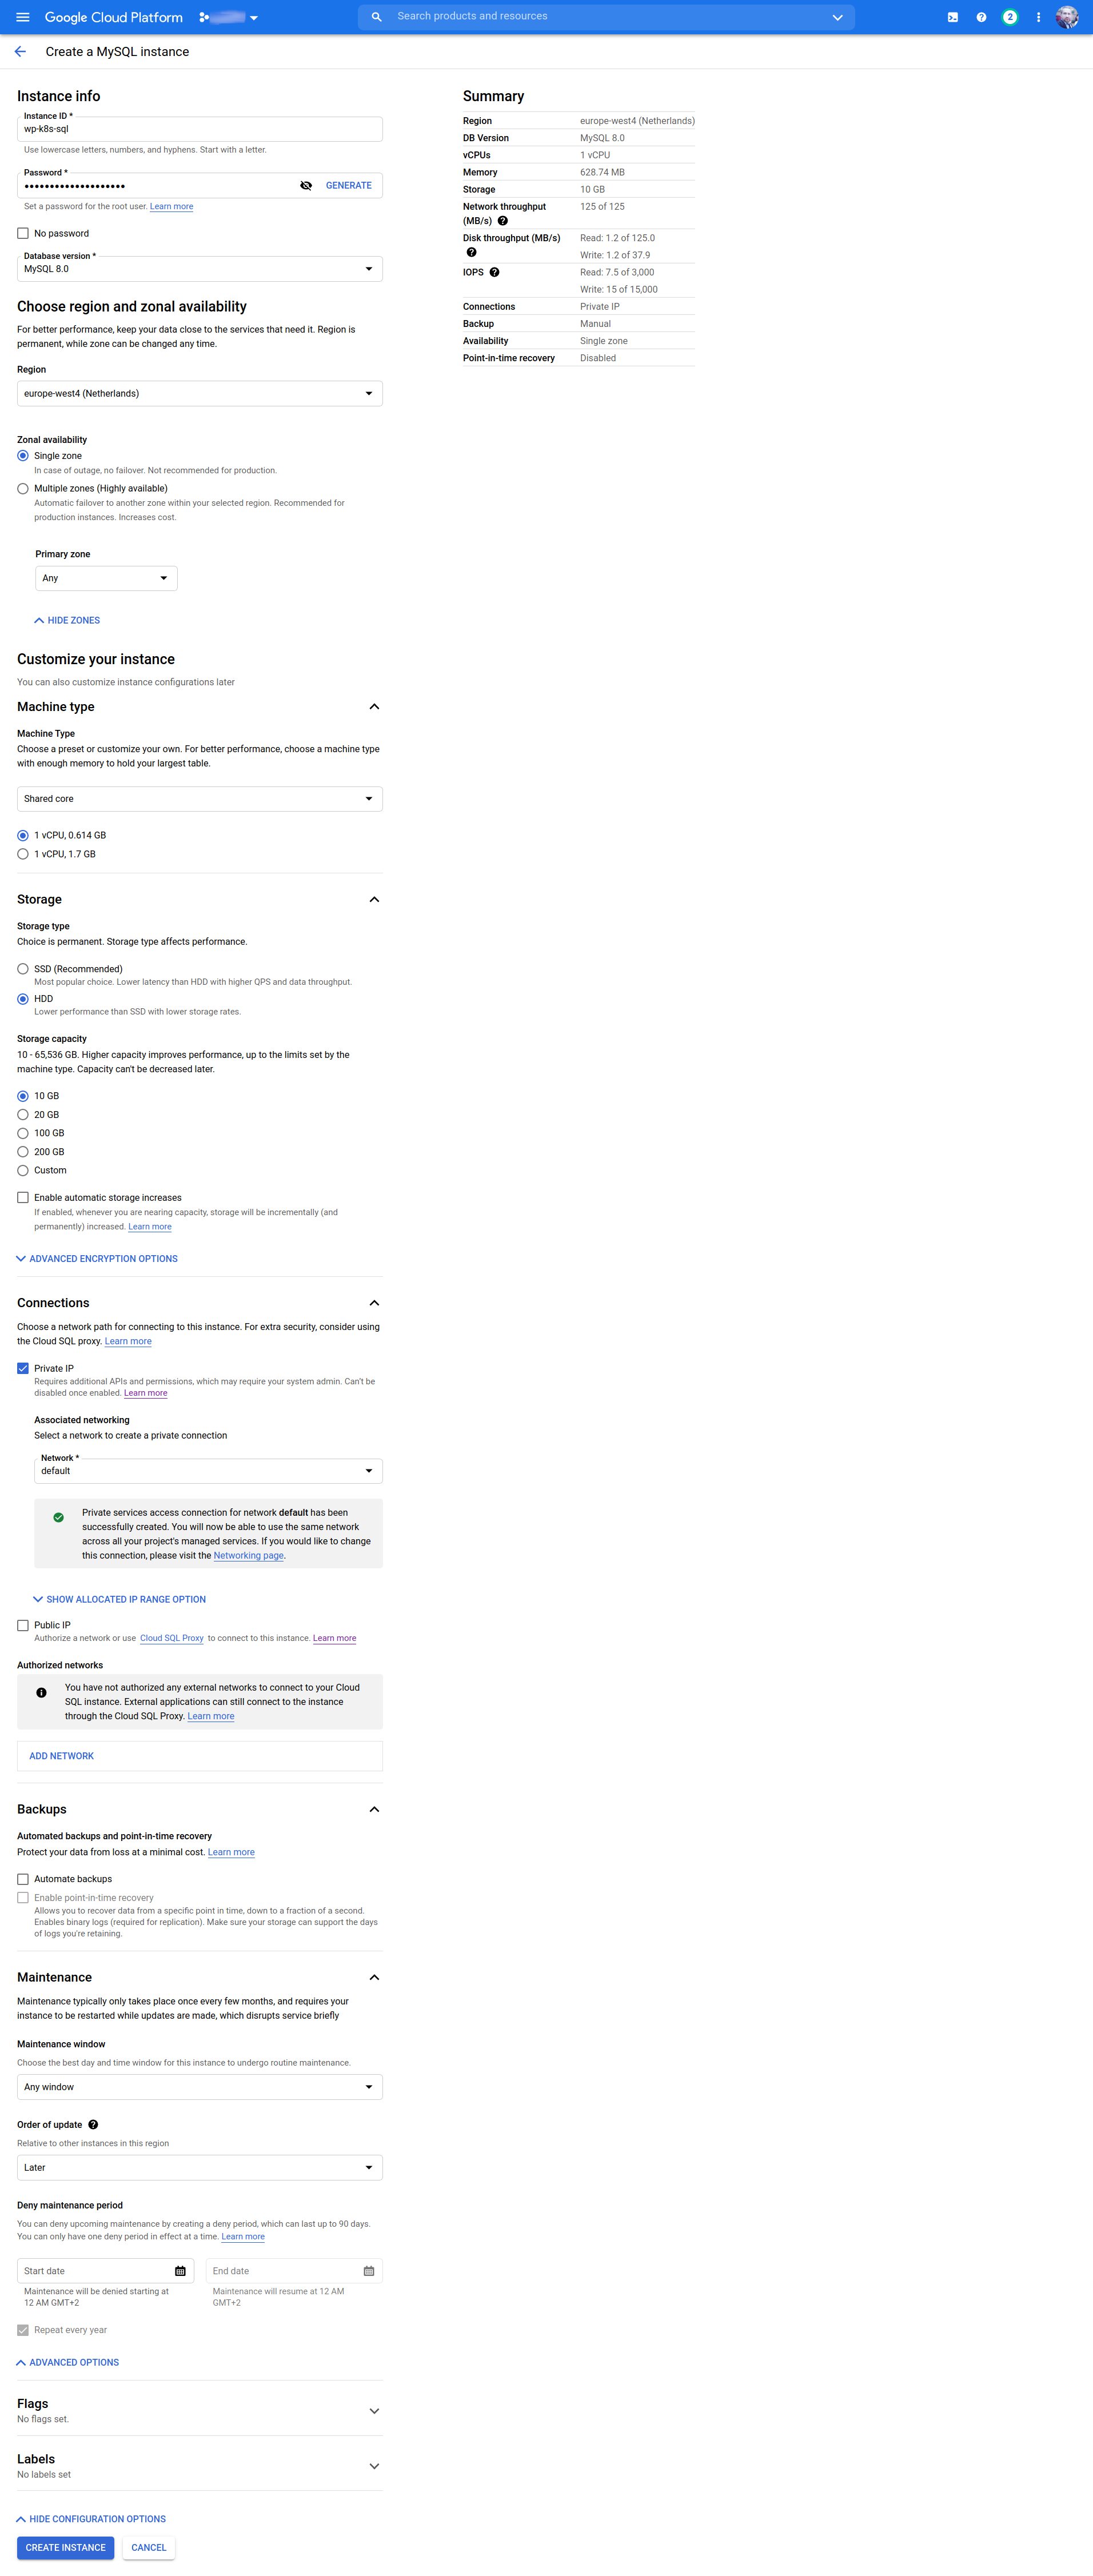
In “wp-k8s-sql info” screenshot on the right you can see all the fields I’ve selected to have my database running in a single zone as “db-f1-micro” instance with 1 vCPU, 0.60GB RAM and 10GB storage for 8,82€/10.25$ a month.
More info can be found on official documentation GCP SQL – Create instances page.
Once the SQL instance has been created, wordpress database needs to be created.
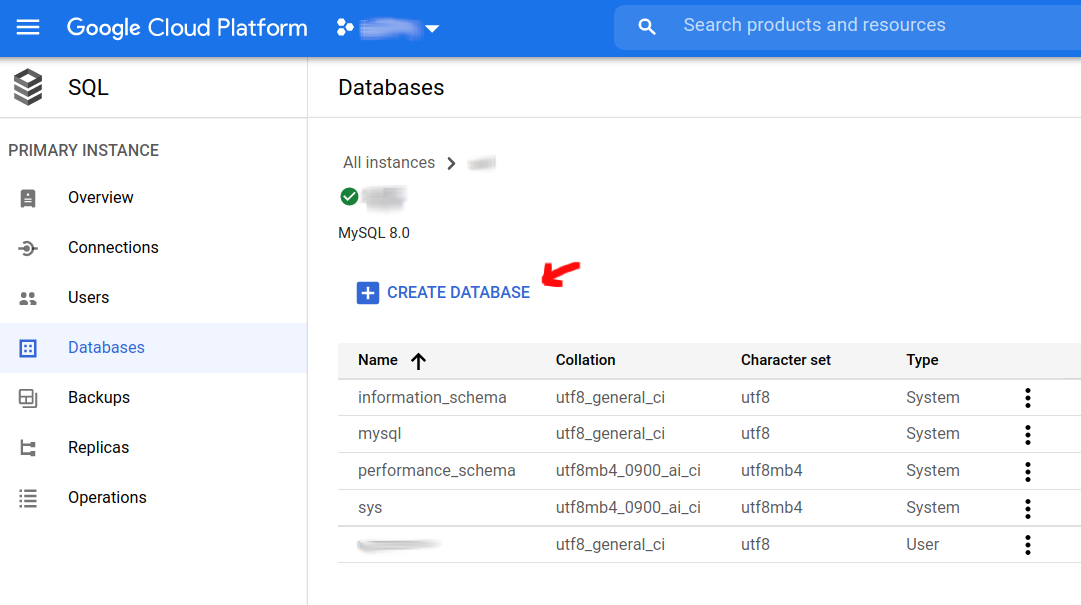

Once the WordPress database has been created, we’ll need to provide access rights to it from “wp-db-user” which will be used during WordPress setup. To do this we need to connect to our MySQL instance. However, since it’s located on private network blocked off from internet, you’ll may want to resort to setting up Cloud SQL Auth proxy.
However, since this whole lengthy process of setting up database needs to be performed only once. Another (easier) solution that can be done is to edit settings for newly “wp-k8s-sql” MySQL instance, and under connections enable public IP. Once the public IP has been assigned, connect to the instance instance using “Cloud Shell”

Followed by:
- Login as root to database:
mysql -u root -p - Show databases and make sure
wpdbdatabase created in previous step is there:show DATABASES; - Create “wp-db-user” user (change $PSW with password you want to use):
CREATE USER 'wp-db-user'@'%' IDENTIFIED BY '$PSW'; - Grant all privileges to
wp-db-useruser onwpdbdatabase be accessible from any IP:GRANT ALL PRIVILEGES ON *.* TO 'wp-db-user'@'%' IDENTIFIED BY '$PWD' WITH GRANT OPTION; - Verify permissions granted to
wp-db-userSHOW GRANTS FOR 'wp-db-user'; - Apply changes:
FLUSH PRIVILEGES; - Go back to edit settings for “wp-k8s-sql” MySQL instance, and under connections disable public IP.
After this has been done, our MySQL database is ready to be connected to the WordPress instance.
Step 3: NFS & Persistent volume/disk
- Step 3.1 Create persistent disk in GKE
gcloud compute disks create --size=10GB --zone=europe-west4-a wp-nfs-disk
Please note! Instead of using NFS server, alternatively WP-Stateless WordPress plugin can be used, where media will be served from Google Cloud Storage bucket instead. See wp-k8s Github ReadMe for more details!
Further information about Step 3
In line above, we’re creating a 10GB persistent disk in europe-west4-a (Netherlands) zone. Intention is so media (data) of our WordPress instance will persist on this disk even if cluster was completely removed.
While this whole procedure was summarized into a single line of text. This is the step on which I’ve spent most time on facing various complications and challenges, which in the end were resolved by some clever engineering and hacks.
- Problem 3.1: WordPress by its nature is stateful application which is a problem in Cloud Native paradigm where we preferably want our applications to be stateless. While as part of “Step 2” it was configured so all WordPress information will be stored in an external MySQL database. Which will be safe and intact even if our cluster was completely deleted. However, we still have a problem where to store all WordPress media related data.
- Problem 3.2: Storing all media data on GCP Persistent disks is problematic since it only supports “ReadWriteOnce” and “ReadOnlyMany” access modes. This makes cluster-autoscaling and HPA a borderline impossible task. As I’m solely interested in “ReadWriteMany” access mode which allows the volume to be mounted as “read-write” by many nodes.
- Problem 3.3: GCP has a service called Filestore which allows you to store files to NFS, which addresses 2 previously mentioned problems. Only catch is minimum capacity for a Filestore instance is 1TB, which will cost you 192.88€/225.28$ per month. If it fits your budget, this might the best solution. However, for me as someone who has a NAS with 32TB of storage along with NFS, using Filestore didn’t fit the bill.
- Solution (to all 3.x problems):
- Create nfs-server-k8s: NFS server container image for Kubernetes.
- Create nfs-server-k8s image deployment with its service being exposed internally to k8s cluster, along with creation of PersistentVolume (PV) and PersistentVolumeClaims (PVC) with
ReadWriteManyaccess modes. - Create Persistent disk in GCP which will serve as a volume to our NFS deployment and will be linked as part of nfs-server-k8s PV/PVC.
Worth mentioning is this option will only set you back additional 0,44€/0.37$ a month.
Step 4: WordPress
Step 4.1 Fill out kustomization.yaml file:
- Replace
password=redactedunder:mysql-root-passsecret name with root password created duringwp-k8s-sqlMySQL instance creationwp-db-hostsecret name with private IP ofwp-db-hostMySQL instancewp-db-usersecret name withwp-db-usermysql-db-passsecret name with whatever you had specified as “$PWD” when creatingwp-db-useras part of Step 2.wp-db-namesecret name withwpdbvalue for WordPress database name
Step 4.2: Deploy WordPress, NFS server, Ingress, VPA, HPA by making sure only following lines are enabled/uncommented as part of kustomization.yaml
- nfs.yaml
- mysql-cluster.yaml (only if you’re not using Cloud SQL database and want to deploy MySQL cluster as part of worknodes)
- wordpress-deployment.yaml
- vpa.yaml
- hpa.yaml
- ingress.yaml
Followed by running:kubectl apply -k ./
This step will create necessary secrets as part of “kustomization.yaml” file and deploy:
- nfs.yaml – will create NFS server using nfs-server-k8s, for further reference refer to “Solution (to all 3 problems)” section of Step 3.
- wordpress-deployment.yaml – will create WordPress deployment using (official WordPress docker image) and its service. It will pick up secrets & variables set as part of “kustomization.yaml” file. Deployment will utilize our previously created NFS PVC. As part of a ConfigMap, various changes which to allow upload of size up 64MB. Which will fix problems of not being able to upload large files due to their file size or image dimension.
- vpa.yaml – will create VPA whose function has been described in “wp-k8s (WordPress on Kubernetes project)” section.
- hpa.yaml – will create HPA whose function has been described in “wp-k8s (WordPress on Kubernetes project)” section.
- ingress.yaml – will create an Ingress whose functionality will be describe in next step (Step 5. Ingress).
Step 5: Ingress
Ingress will be our entry point to the cluster, as it will expose HTTP/HTTPS routes for our WordPress deployment. It will also create a load balancer with external IP and will serve as such.
Step 5.1: Add ingress-nginx Helm chart repositoryhelm repo add ingress-nginx https://kubernetes.github.io/ingress-nginx
Step 5.2: Install ingress-nginx Helm charthelm install ingress ingress-nginx/ingress-nginx \
--set 'ingress.annotations.nginx.ingress.kubernetes.io/client-max-body-size=40m'
Step 5.3: Watch status and wait to get ingress controller’s exposed external IPkubectl get services -w ingress-ingress-nginx-controller
Step 5.4: Copy exposed external IP and add/update DNS A record for your domain, i.e:

At this point your site will be accessible, but I still don’t encourage to enter any details/proceed with WordPress installation until we have secure HTTPS connection described in next step.
Further information about Step 5
All our routes were applied as part of ingress.yaml file which was executes as part of kustomization.yaml as part of Step 4. If you wish to add any other sub/domains or redirects, they would be added as part of ingress.yaml file.
Step 6: Cert-manager (Let’s Encrypt)
In this step we’ll configure cert-manager to request and automatically renew Let’s Encrypt certificate for domain used in previous step.
Step 6.1: Add cert-manager Helm repohelm repo add jetstack https://charts.jetstack.io
Step 6.2: Create namespace for cert-managerkubectl create namespace cert-manager
Step 6.3: Install cert-managerhelm install cert-manager jetstack/cert-manager \
--namespace cert-manager \
--set installCRDs=true
Step 6.4: Verify installation
By making sure all cert-manager* workloads have a green checkmark in GKE Workloads.

Step 6.5: Create Let’s Encrypt certificate issuerstaging(optional)kubectl apply -f cluster-issuer-staging.yaml
While this step is optional, it’s recommended to first createstagingcertificate which will create self-signed (insecure) certificate using Let’s Encrypt certificate staging environment. This is solely used to test if everything is setup correctly with DNS and ingress, before proceeding withproductionand avoid reaching Let’s Encrypt Rate Limits.
Step 6.6: Create Let’s Encrypt certificate issuerproductionkubectl apply -f cluster-issuer.yaml
Step 6.7: Check certificate request was successfulkubectl describe certificate wordpress-tls
Step 6.8: Wait until your Let’s Encrypt certificate is readywatch kubectl get certificate
OnceReadycolumn becomesTrue(this can take few minutes) domain name you set “Step 5.4” will be available via HTTPS using Let’s Encrypt TLS certificate. With this done, your wp-k8s (WordPress on Kubernetes) has been complete!

Questions & Answers (Q&A)
- What are the total costs to have this exact setup running in GKE (GCP)?
On paper, since Google only charges for Kubernetes worker nodes, costs of running single “ec2-small” (11,53€/13.42$) instance along with “db-f1-micro” Cloud SQL MySQL (8,82€/10.25$) database instance and 10GB gcePersistentDisk disk (0,44€/0.37$ per GB) will cost around ~20,72€/24,11$. However as part of “Step 5.3” a load balancer which just by itself will cost 0,023€/0.027$ an hour which equates to additional 16,79€/19.71$ per month.
Monthly grand total: 37,51€/43.66$
While this is high monthly price to pay for private blog, if you’re a business that uses WordPress, for resilient/auto scalable setup like this one this price is a steal. I’m also getting certain discounts on my resource, hence I’ll definitely give it a month to see what my final monthly cost are.
In the future I want to migrate Cloud SQL MySQL database to a MariaDB server hosted on my Synology NAS, and potentially do the same with WordPress media data (NFS server) and have it hosted on premise as well. Having only the Kubernets workload in GKE would drastically reduce the price. If I end up doing this, you’ll hear more about in one of the future blog posts.
- How can I show my support and appreciation for this project?
If you found this project useful, show your support and appreciation by donating or contributing code. Otherwise, giving credits and acknowledgments also go a long way.
- Happy hacking & if you found this useful, also consider becoming my GitHub sponsor!
Comments