I’ve been using IRC since late 1990’s, and I continue to do so to this day due to it (still) being one of the driving development forces in various open source communities. Especially in Linux development … and some of my acquintances I can only get in touch with via IRC :)
My Setup
On my Synology NAS I run ZNC (IRC bouncer/proxy) to which I connect using various IRC clients (irssi/XChat Azure/AndChat) from various platforms (Linux/Mac/Android). In this case ZNC serves as a gateway and no matter which device/client I connect from, I’m always connected to same IRC servers/chat rooms/settings when I left off.
This is all fine and dandy, but connecting from external networks to ZNC means you will hand in your ZNC credentials in plain text. Which is a problem for me, even thought we’re “only” talking about IRC bouncer/proxy.
With that said, how do we encrypt external traffic to our ZNC?
HowTo: Chat securely with ZNC on Synology using Let’s Encrypt SSL/TLS certificate.
For reference or more thorough explanation of some of the steps/topics please refer to: Secure (HTTPS) public access to Synology NAS using Let’s Encrypt (free) SSL/TLS certificate.
Requirements:
- Synology NAS running DSM >= 6.0
- Sub/domain name with ability to update DNS records
- SSH access to your Synology NAS
1: DNS setup
Create A record for sub/domain you’d like to use to connect to your ZNC and point it to your Synology NAS external (WAN) IP. For your reference, subdomain I’ll use is: irc.hodzic.org
2: Create Let’s Encrypt certificate
DSM: Control Panel > Security > Certificates > Add
Followed by:
Add a new certificate > Get a certificate from Let's Encrypt
Followed by adding domain name A record was created for in Step 1, i.e:

After certificate is created, don’t forget to configure newly created certificate to point to correct domain name, i.e:

3: Install ZNC
In case you already have ZNC installed, I suggest you remove it and do a clean install. Mainly due to some problems with package in past, where ZNC wouldn’t start automatically on boot which lead to creating projects like: synology-znc-autostart. In latest version, all of these problems have been fixed and couple of new features have been added.
ZNC can be installed using Synology’s Package Center, if community package sources are enabled. Which can simply be done by adding new package sources:
Name: SynoCommunity
Location: http://packages.synocommunity.com

To successfuly authenticate newly added source, under “General” tab, “Trust Level” should be set to “Any publisher”
As part of installation process, ZNC config will be run with most sane/useful options and admin user will be created allowing you access to ZNC webadmin.
4: Secure access to ZNC webadmin
Now we want to bind our sub/domain created in “Step 1” to ZNC webadmin, and secure external access to it. This can be done by creating a reverse proxy.
As part of this, you need to know which port has been allocated for SSL in ZNC Webadmin, i.e:

In this case, we can see it’s 8251.
Reverse Proxy can be created in:
DSM: Control Panel > Application Portal > Reverse Proxy > Create
Where sub/domain created in “Step 1” needs to be point to ZNC SSL/TLS port on localhost, i.e:

ZNC Webadmin is now available via HTTPS on external network for the sub/domain you setup as part of Step 1, or in my case:

As part of this step, in ZNC webadmin I’d advise you to create IRC servers and chatrooms you would like to connect to later.
Step 5: Create .pem file from LetsEncrpyt certificate for ZNC to use
On Synology, Let’s Encrypt certificates are stored and located on:
/usr/syno/etc/certificate/_archive/
In case you have multiple certificates, based on date your certificate was created, you can determine in which directory is your newly generated certificated stored, i.e:
drwx------ 2 root root 4096 Sep 10 12:57 JeRh3Y
Once it’s determined which certifiate is the one we want use, generate .pem by running following:
sudo cat /usr/syno/etc/certificate/_archive/JeRh3Y/{privkey,cert,chain}.pem > /usr/local/znc/var/znc.pem
After this restart ZNC:
sudo /var/packages/znc/scripts/start-stop-status stop && sudo /var/packages/znc/scripts/start-stop-status start
6: Configure IRC client
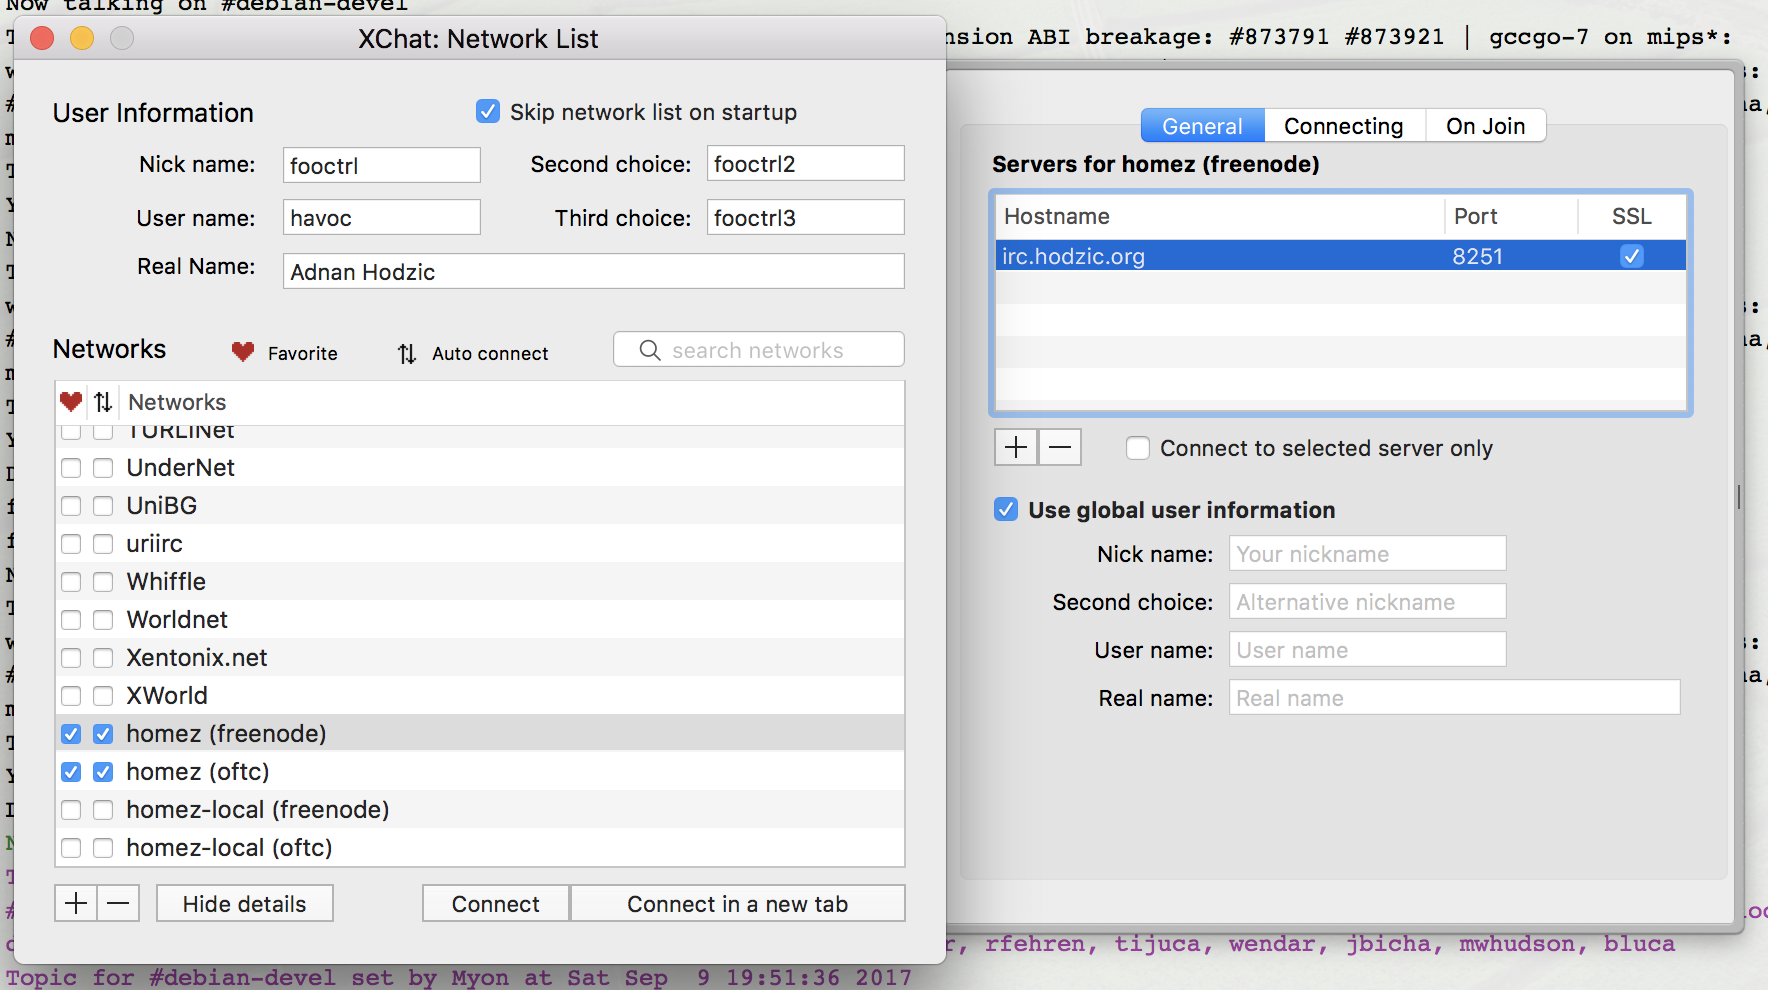
In this example I’ll use XChat Azure on MacOS, and same procedure should be identical for HexChat/XChat clients on any other platform.
Altough all information is picked up from ZNC itself, user details will need to be filled in.
In my setup I automatically connect to freenode and oftc networks, so I created two for local network and two for external network usage, later is the one we’re concentrating on.
On “General” tab of our newly created server, hostname for our server should be the sub/domain we’ve setup as part of “Step 1”, and port number should be the one we defined in “Step 4”, SSL checkbox must be checked.
On “Connecting” tab “Server password” field needs to be filled in following format:
johndoe/freenode:password
Where, “johndoe” is ZNC username. “freenode” is ZNC network name, and “password” is ZNC password.

“freenode” in this case must first be created as part of ZNC webadmin configuration, mentioned in “step 4”. Same case is for oftc network configuration.
As part of establishing the connection, information about our Let’s Encrypt certificate will be displayed, after which connection will be established and you’ll be automatically logged into all chatrooms.
Happy hacking & if you found this useful, consider becoming my GitHub sponsor!
Comments