Secure public access to your Synology?
Every time I’m outside of my home network, and I need to get something from my Synology NAS, I’m facing the same dillema. Who’s sniffing the network I’m on, and who will I hand over my credentials in plain text using HTTP.
Of course, you can add extra security to your Synology account by using 2 step authentication, or first establishing connection to (preferably private) VPN connection. But even then … footprint of sensitive data you’re leaving behind you is just not worth it.
To resolve this problem, you could get a self-signed SSL/TLS certificate, but whole process will cost you time and money. But thanks to good people at Let’s Encrypt, this whole process now takes 15 minutes process and is free!
Secure (HTTPS) access to Synology NAS using Let’s Encrypt (free) SSL/TLS certificate
There are couple of tutorials which cover this same topic, however reason why I wrote my own is because none of them worked for me.
Requirements:
- Synology NAS running DSM >= 6.0
- Domain name with ability to update DNS records
- (Optional) Set port forwarding | public port range is same as on target port range
- (Optional) enabled external access to Synology using DDNS
1. DNS
First thing you need to do is add A record for sub/domain you want to point to your Synology’s external (WAN) IP. Example:
Name:   synology.hodzic.org
Class:  IN
Type:   A
Record: WAN IP
You can find your external IP/WAN IP if you have external access enabled via DDNS
Go to: Control Panel > External Access > DDNS
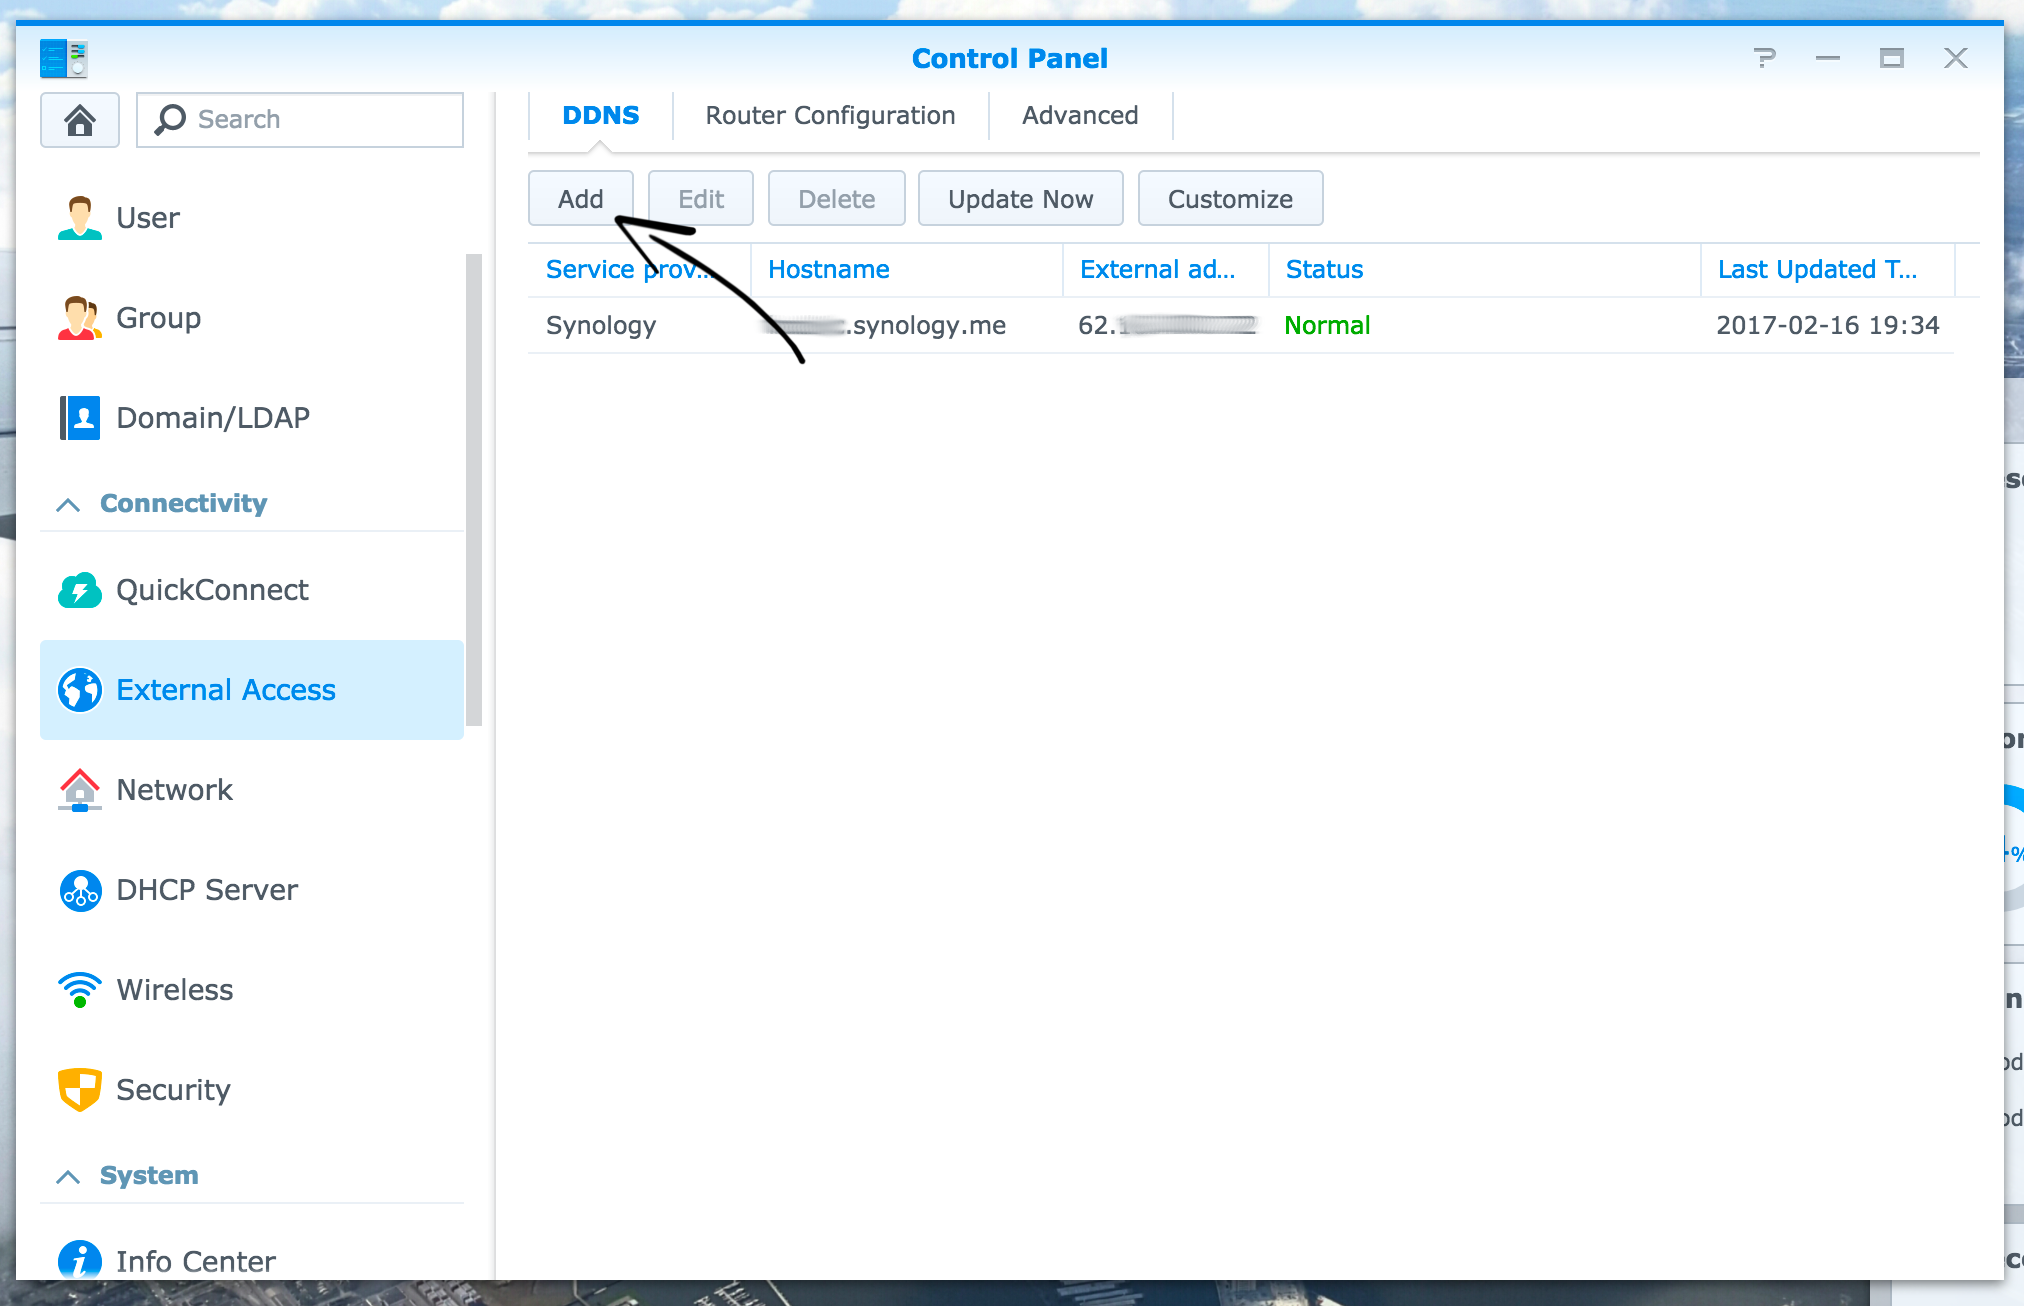
DDNS dialog
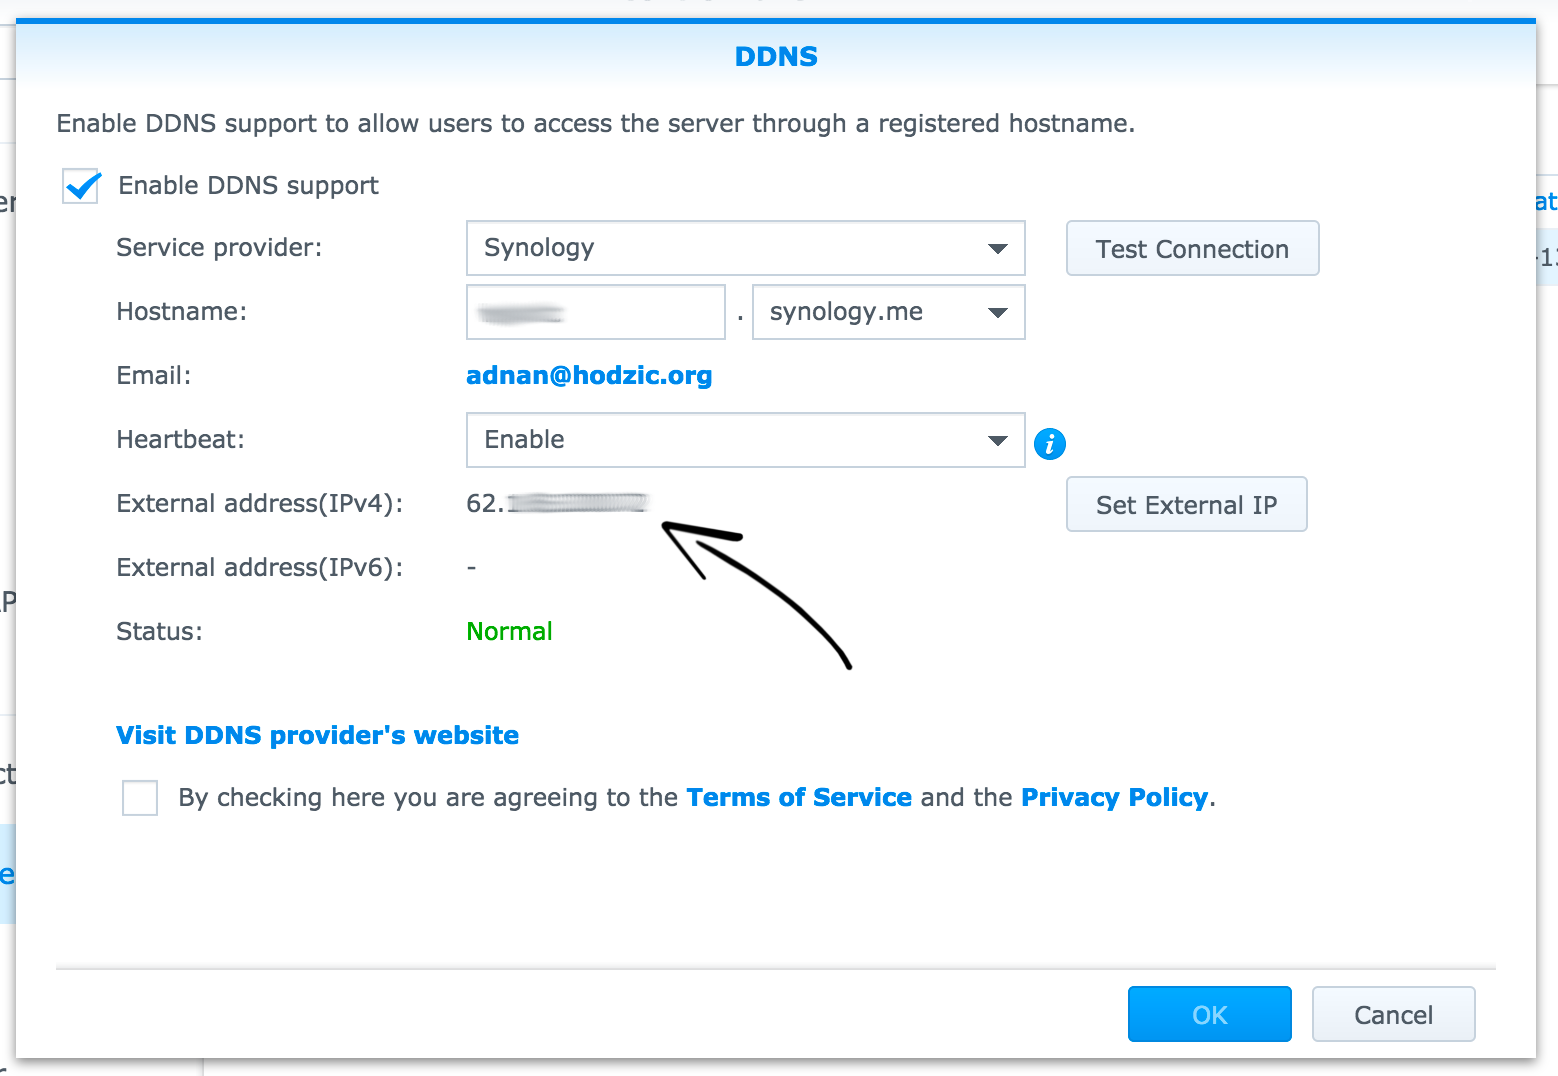
Optional: After DDNS has been configured, subdomain used in “Hostname” section can be used as a CNAME record to point to domain name used as part of “1. DNS”. Example:
Name: xyz.synology.me
Type: CNAME
Record: adnan.hodzic.org
This way specified record/s will be automatically updated when external IP for DDNS is updated.
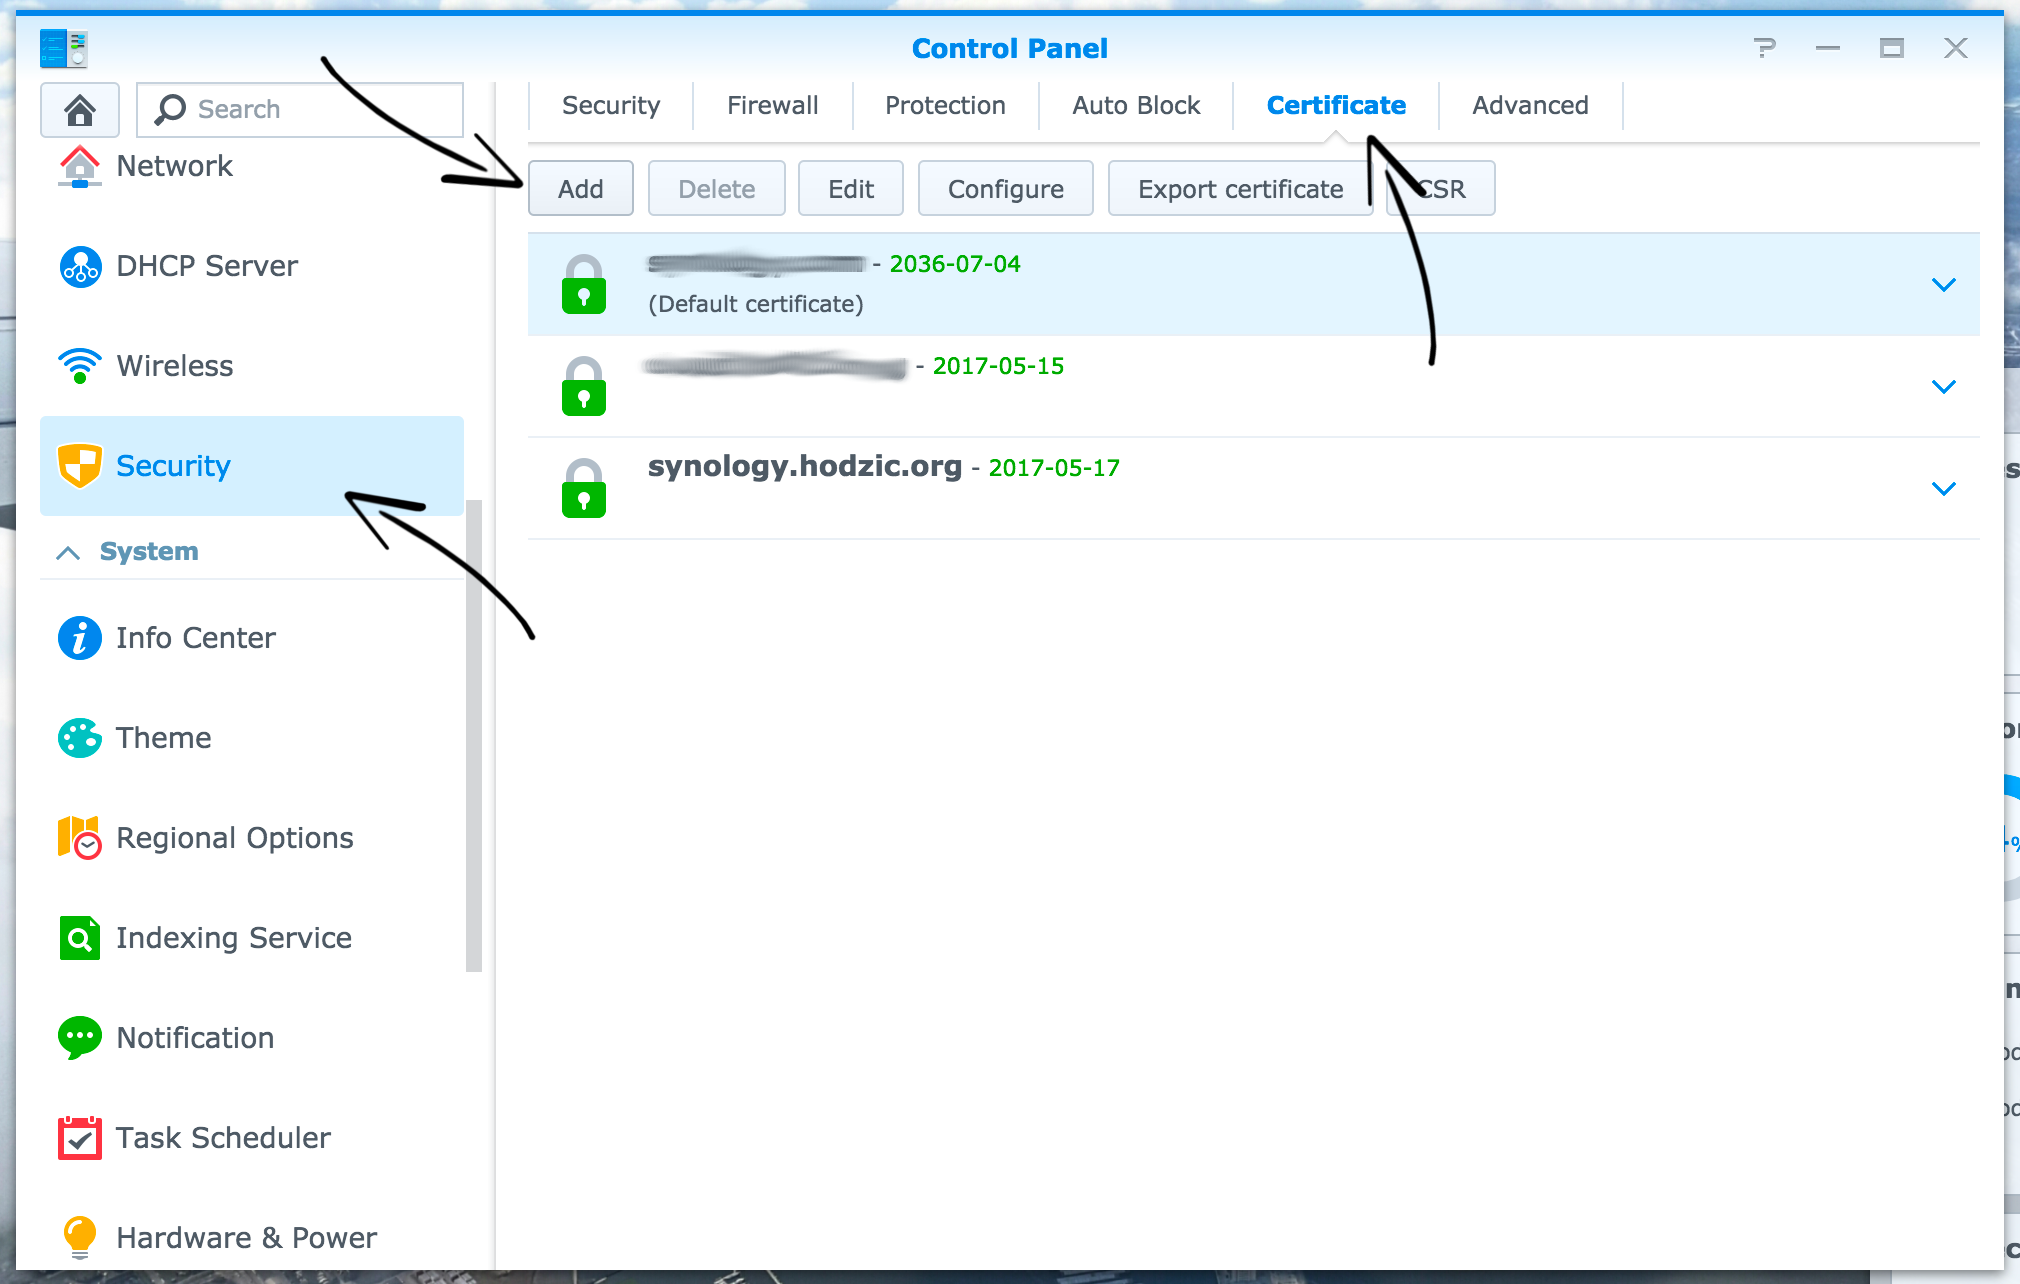
2. Certificate
Now it’s time to obtain Let’s Encrypt SSL/TLS certificate, which you can do by going to:
Control Panel > Security > Certificate > Add
On next dialog click on “Add a new certificate”
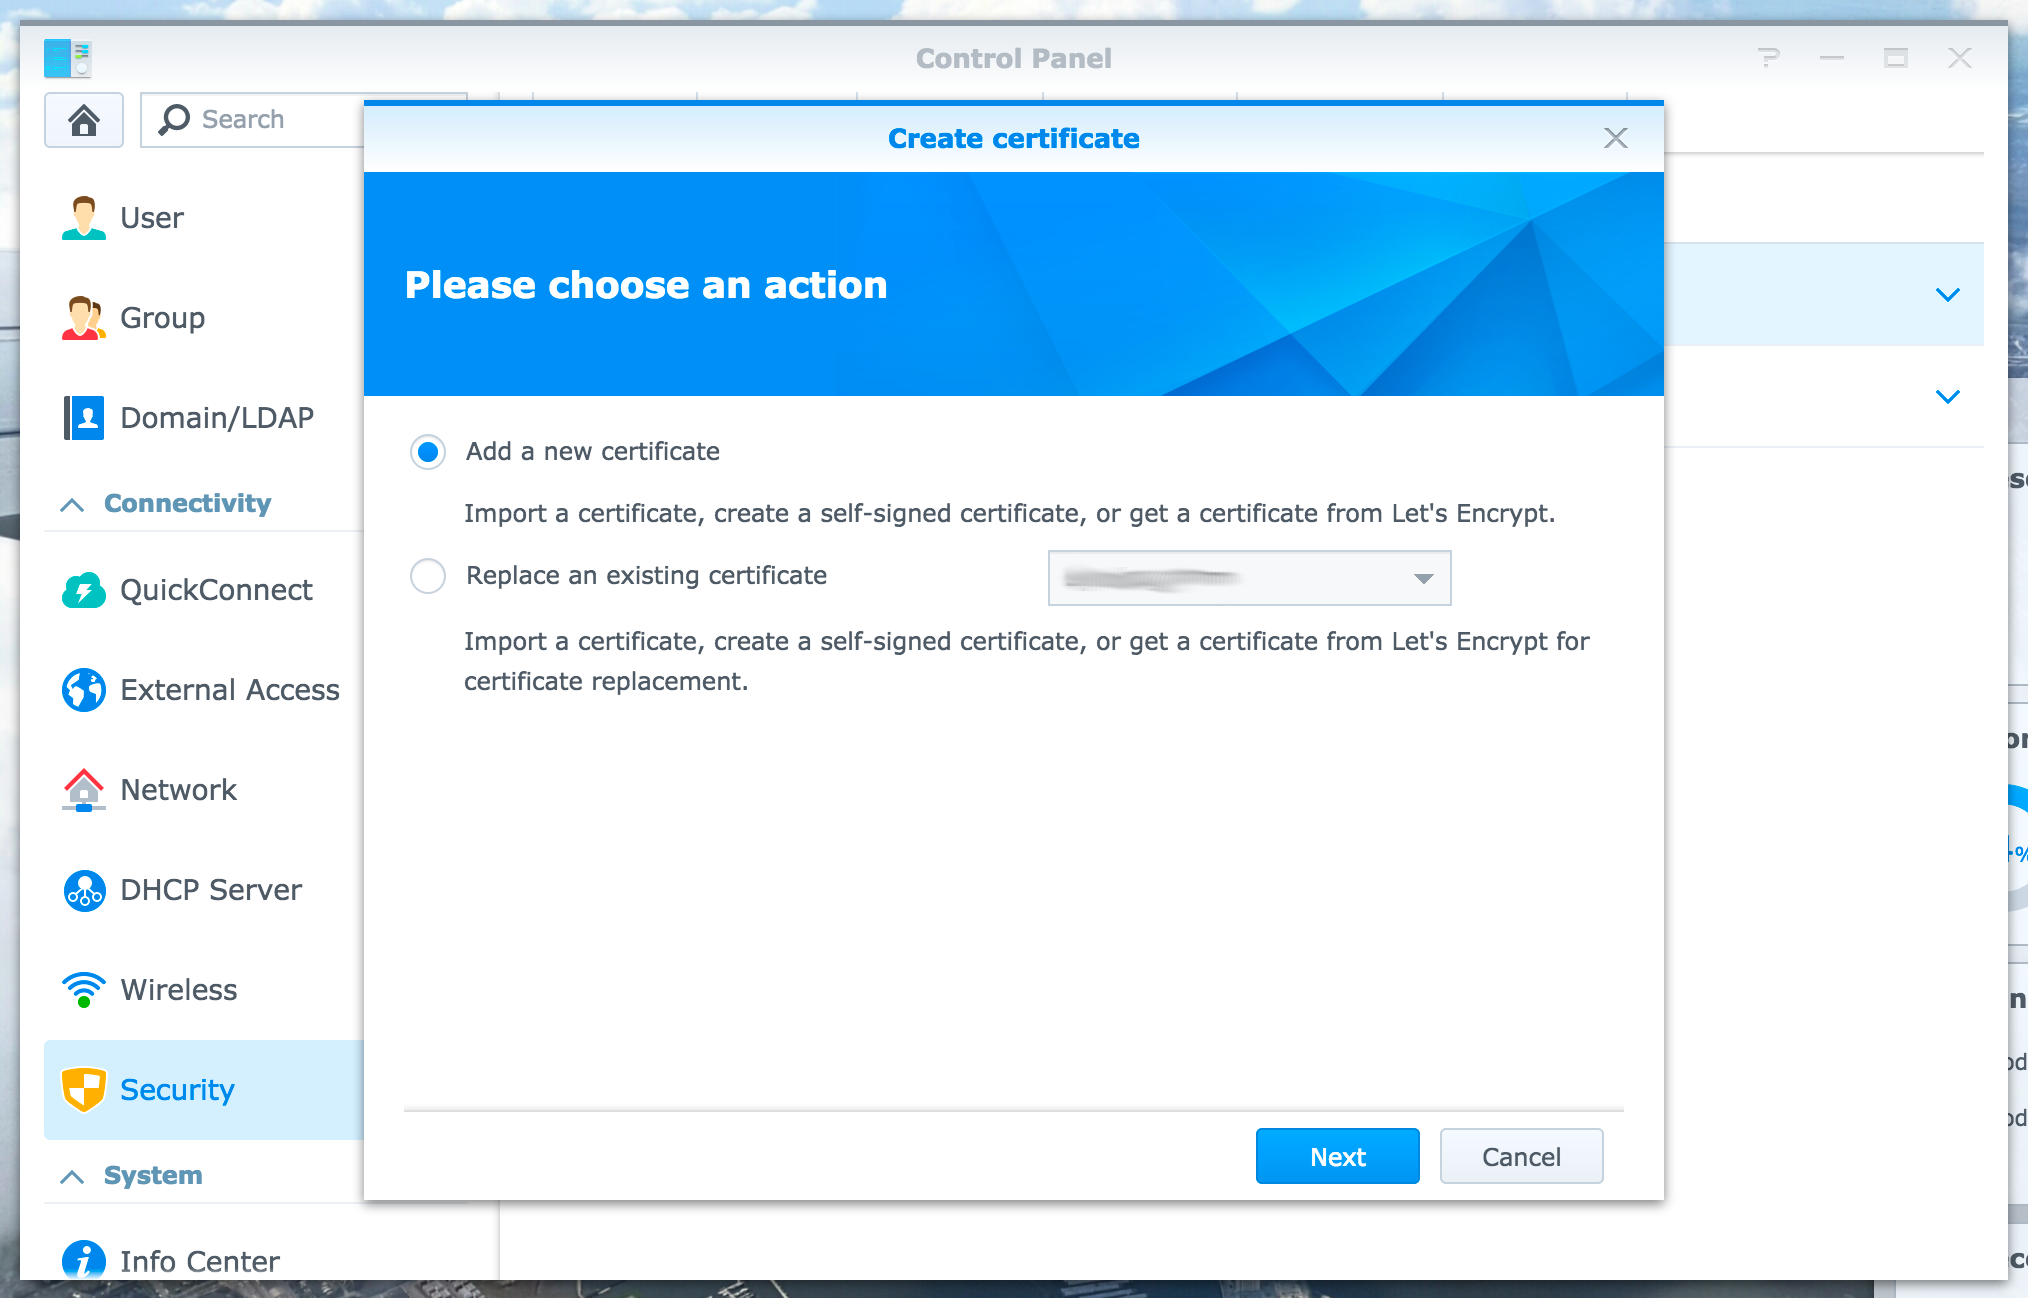
Then select “Get a certificate from Let’s Encrypt”
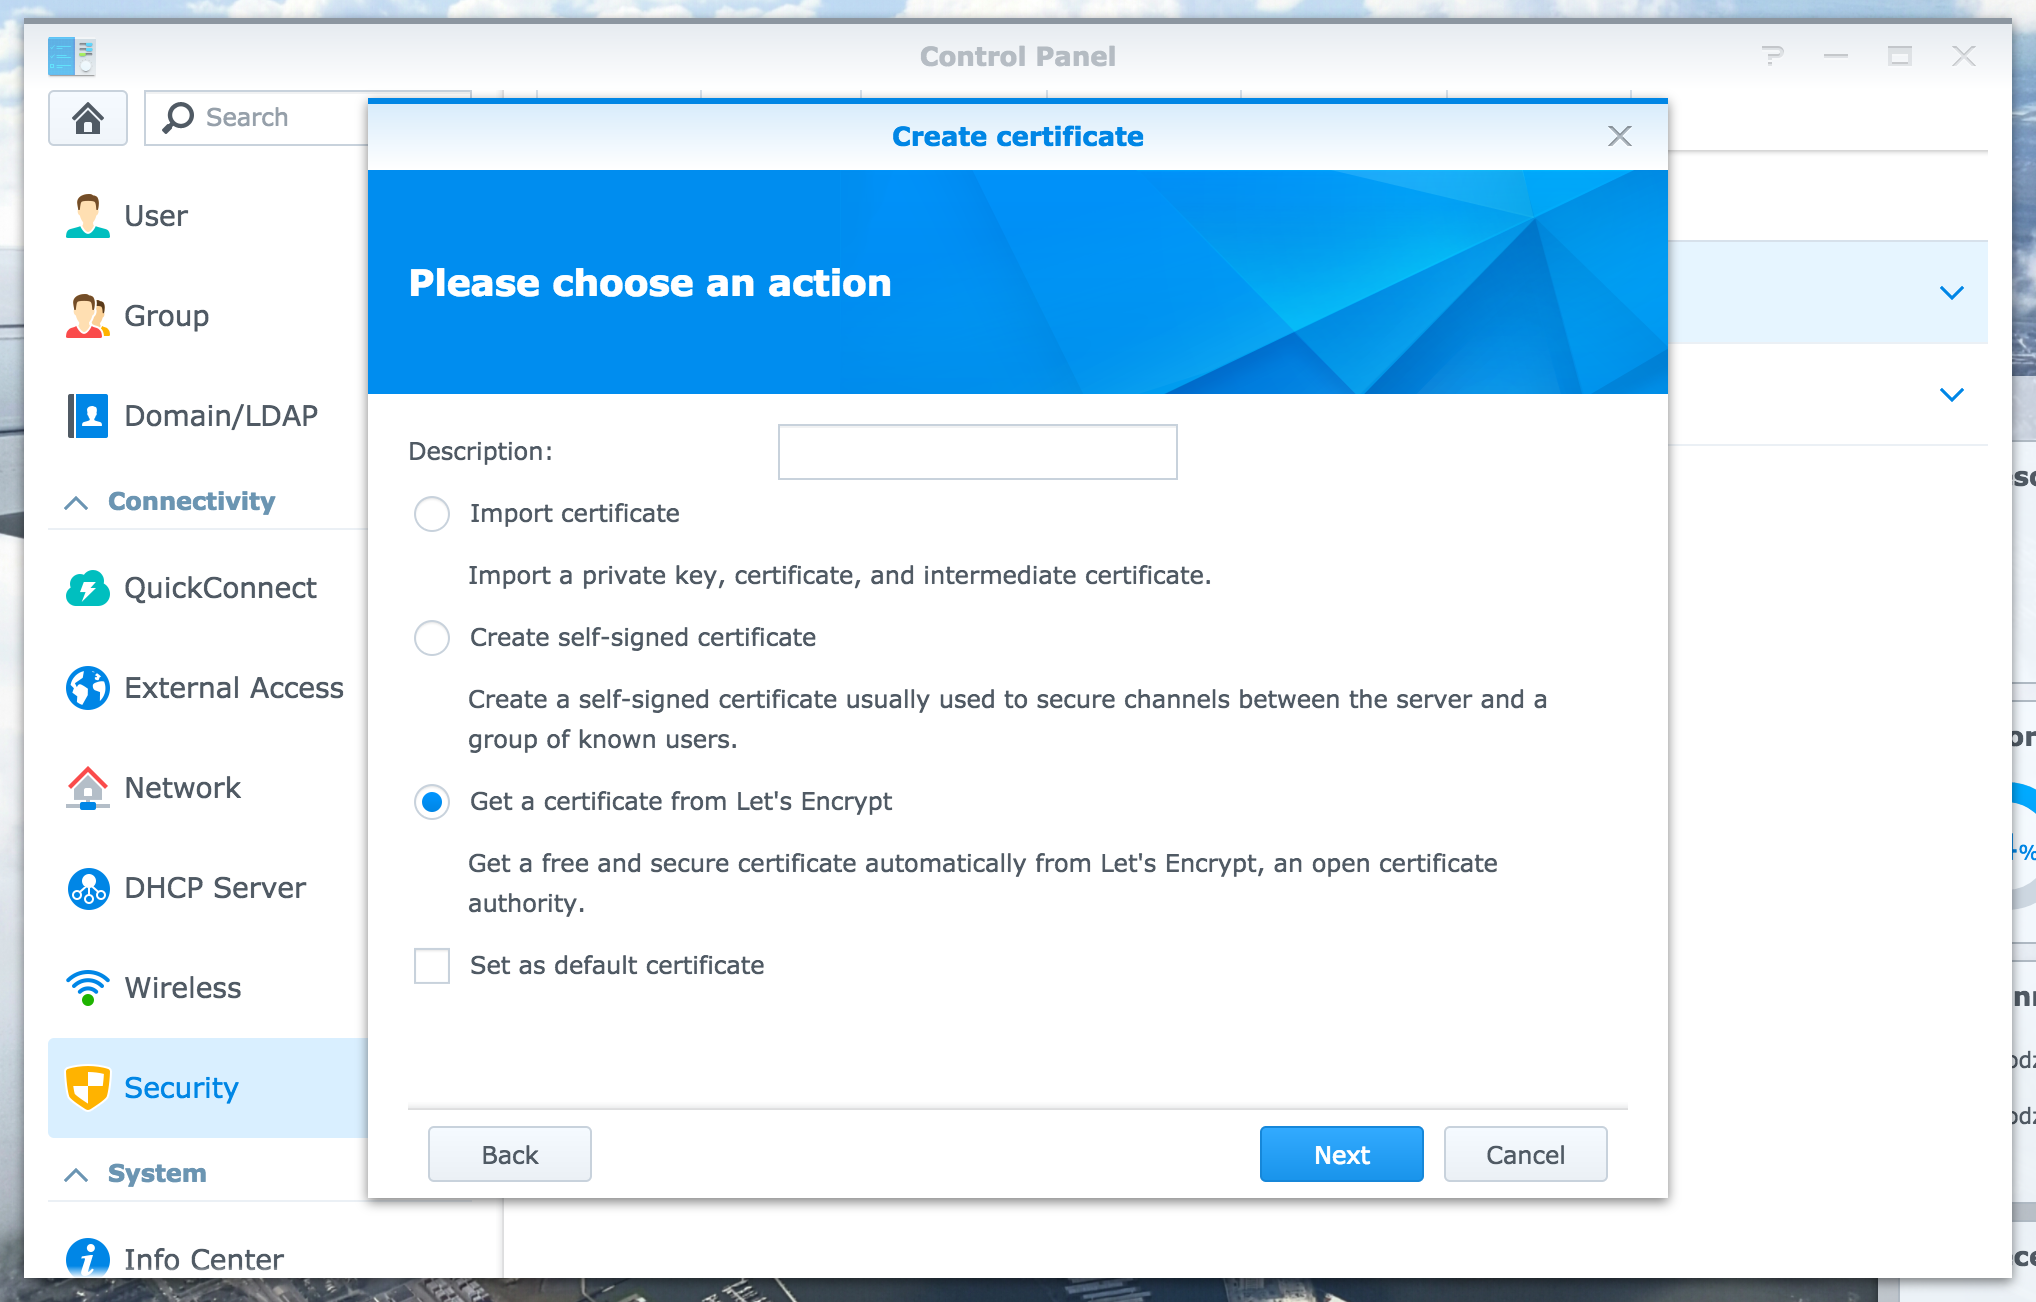
Finally get a certificate from Let’s Encrypt with data as follows:
- Domain name – sub/domain you setup as part of 1. DNS
- Email – email you want to use to renew this certificate
- Subject alternative name – alternative DNS record.
You can use URL you use for external access (DDNS)
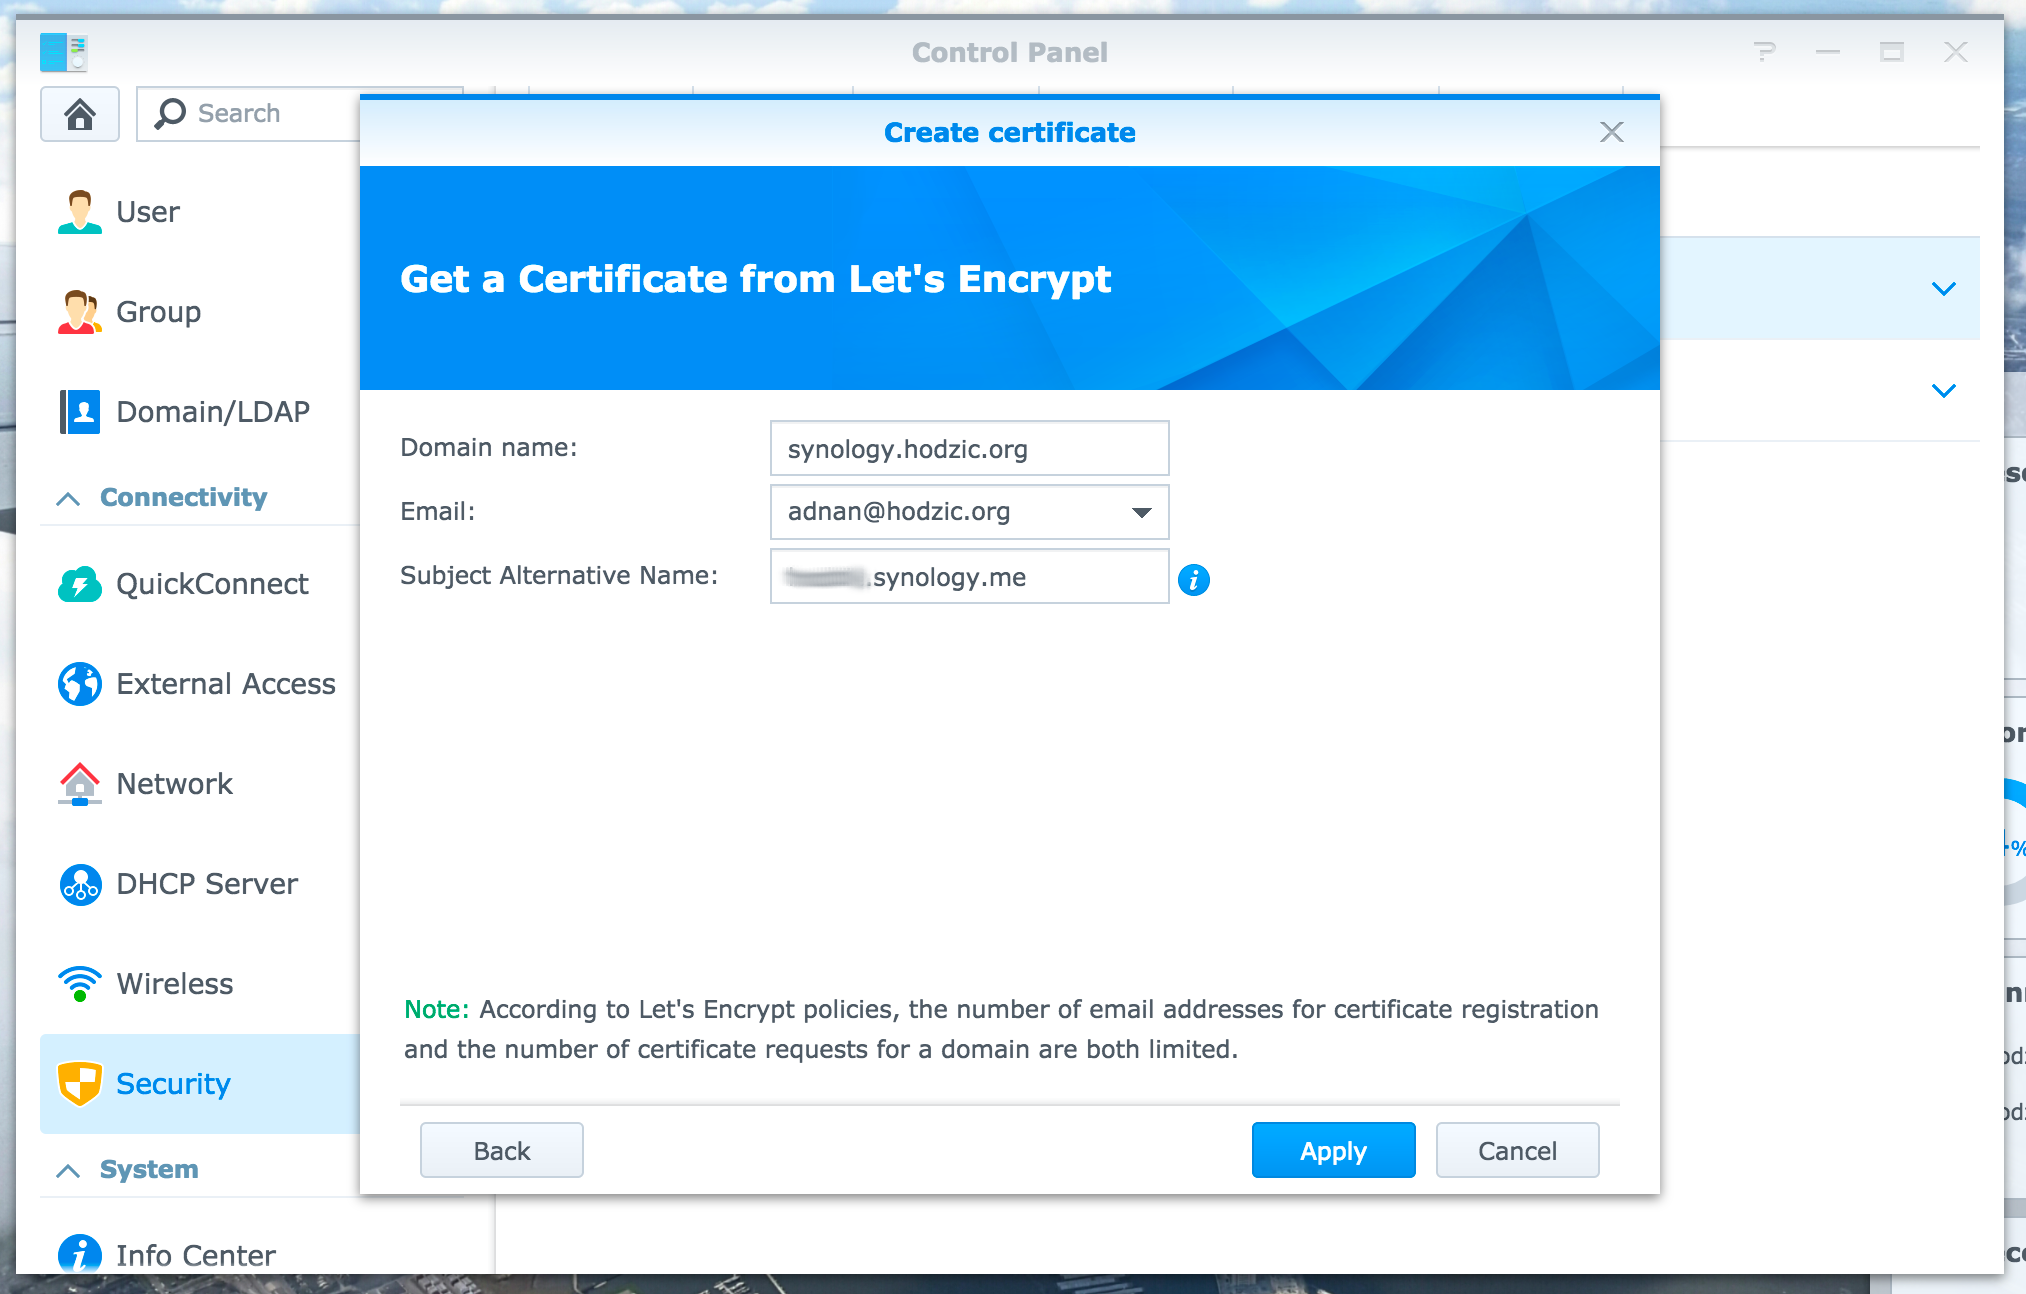
and click on Apply
If obtaining certificate fails, you need to setup port forwarding on your router, as mentioned under Requirements section.
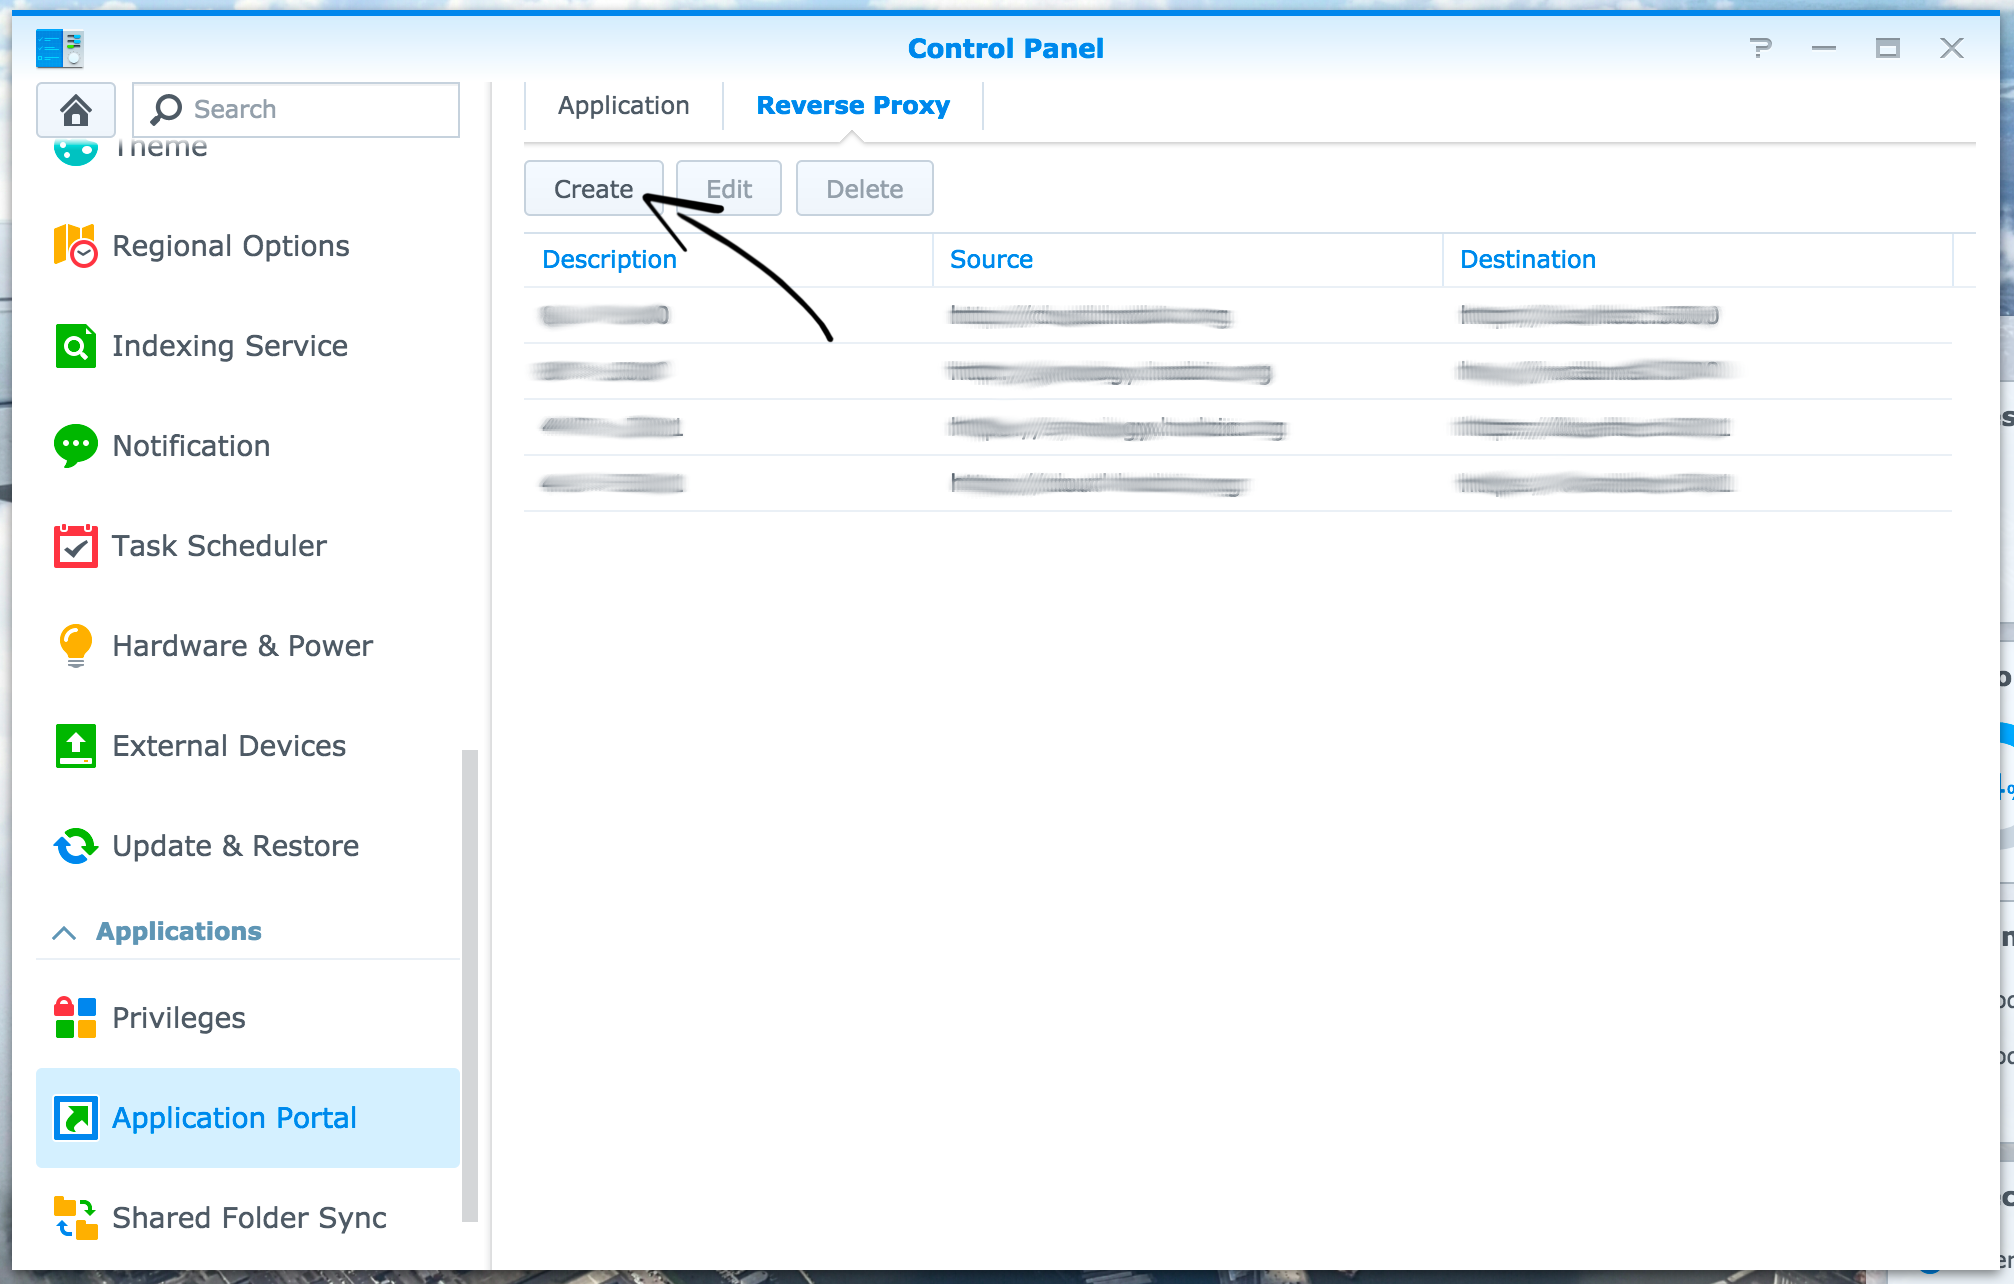
3. Reverse Proxy
While other suggested setting up a web server, idea which makes most sense to me in this case is Reverse Proxy.
Go to Control Panel > Application Portal > Reverse Proxy > Create
By default, DSM ports will be running behind 5000/5001, so in that case we want to point external ports 80 and 443 to them with two rules.
ProxyPass/redirect traffic from example domain port 80 to 5000
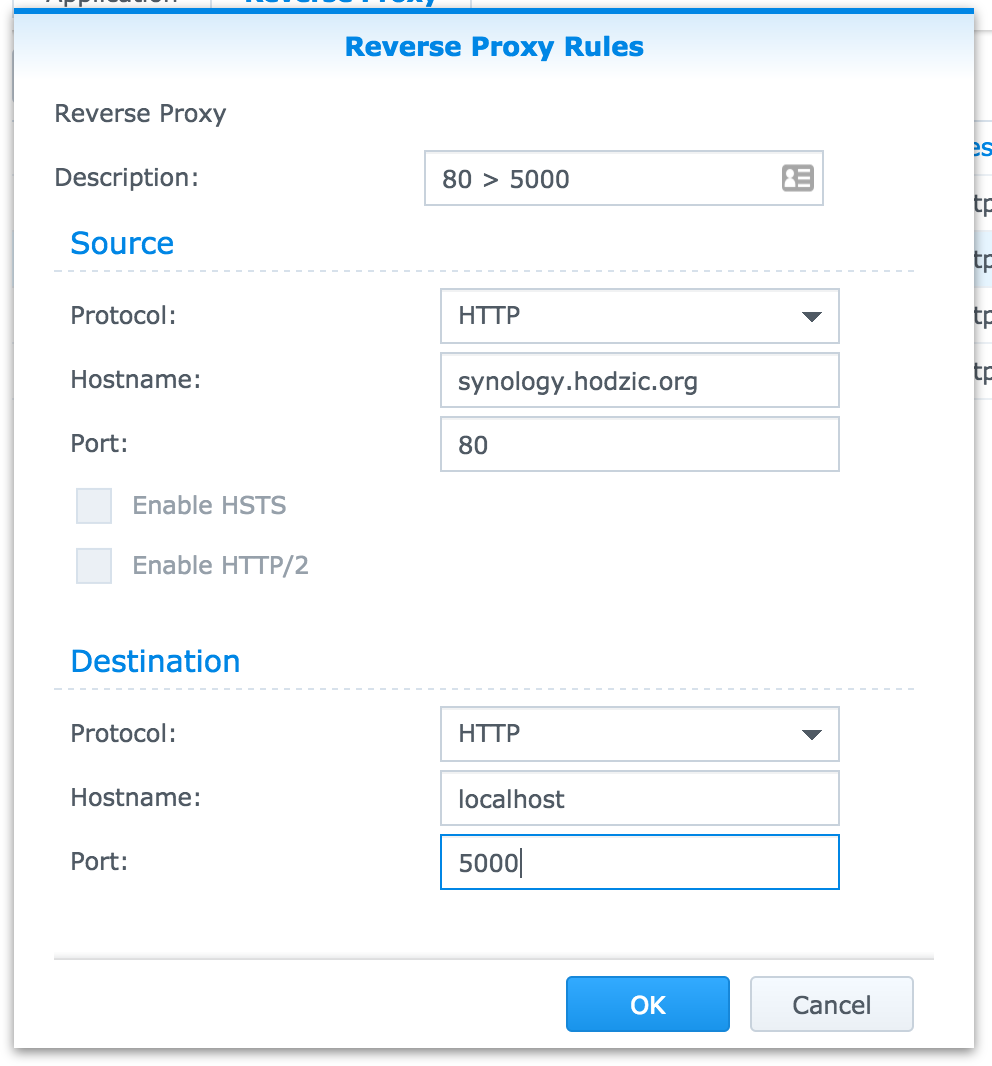
ProxyPass/redirect traffic from example domain port 443 > 5001
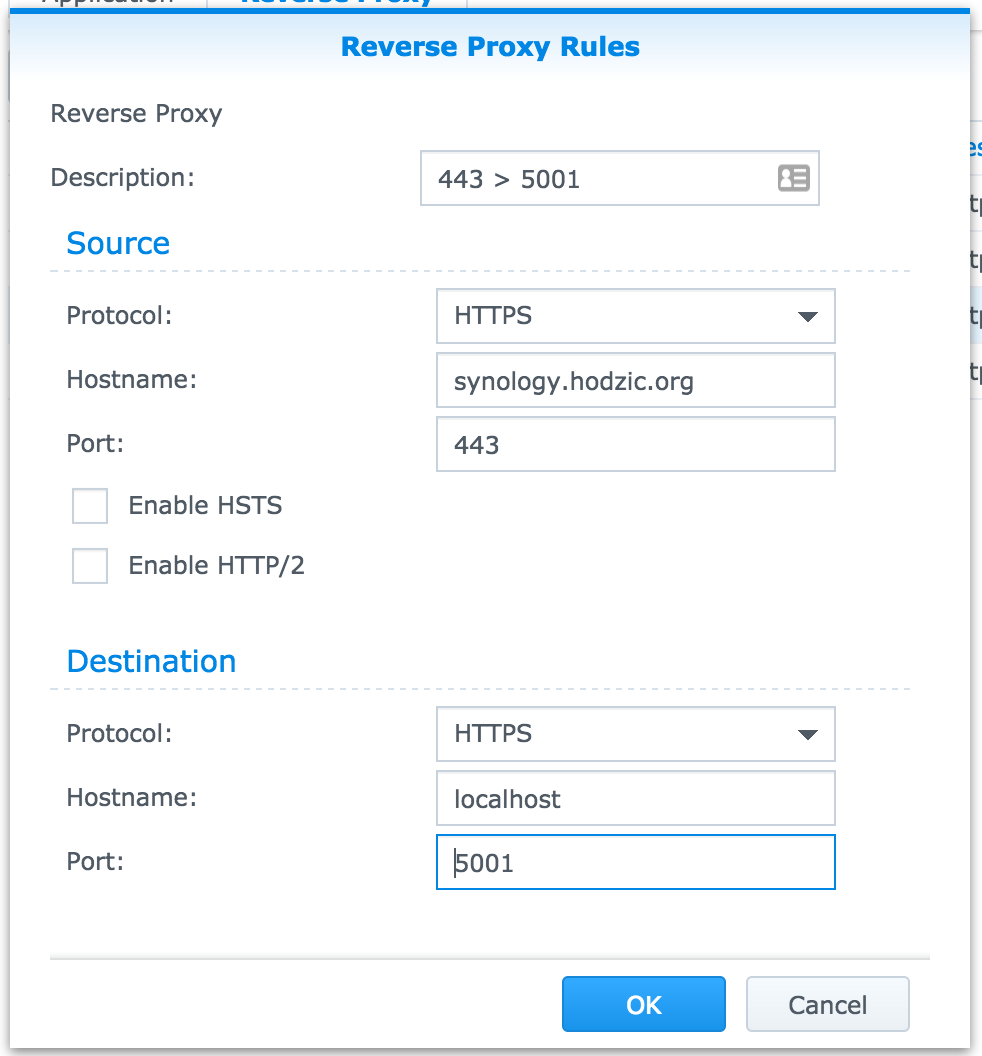
5001″ width=”279″ height=”300″> While unchecked on image above, for HTTPS connections it’s recommended to have both HSTS and HTTP/2 enabled.
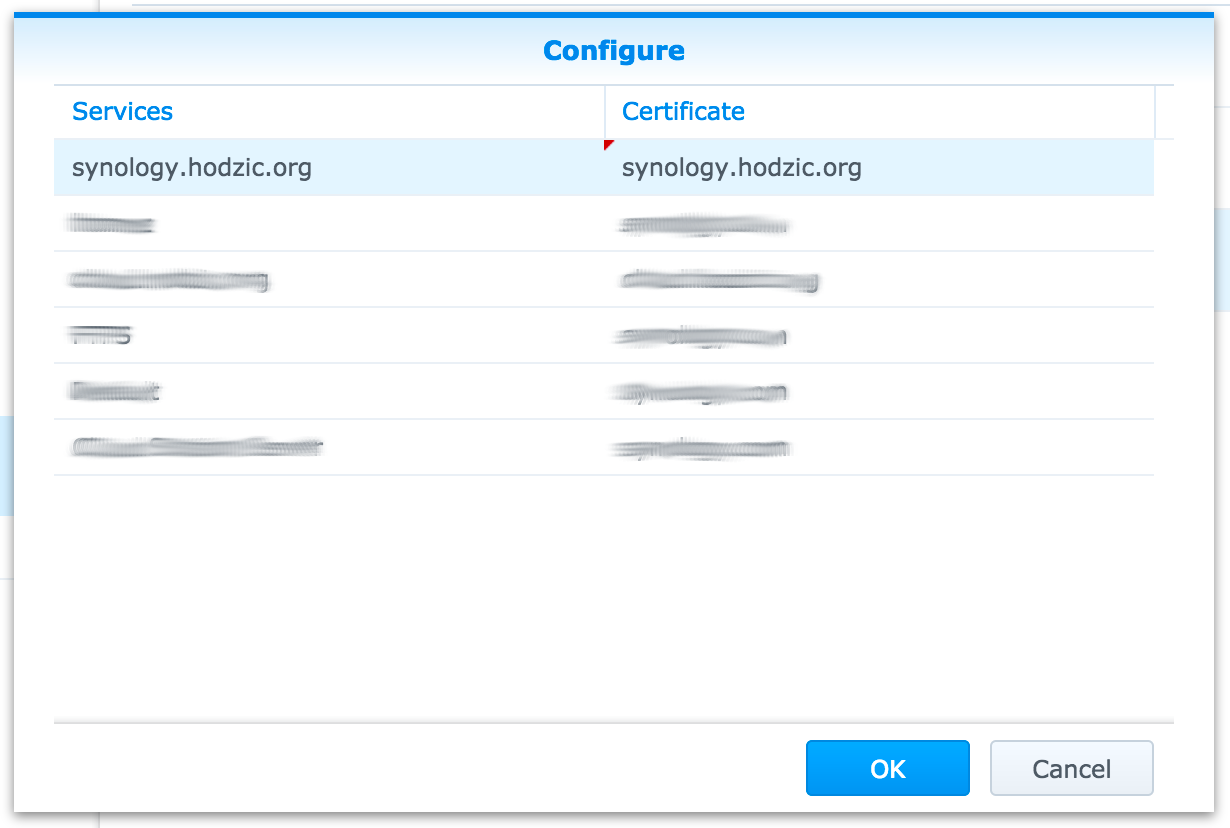
4. Select certificate for your domain
Almost done, now you have to select which certificate you want to use for your sub/domain.
Go to Control Panel > Security > Certificate > Configure
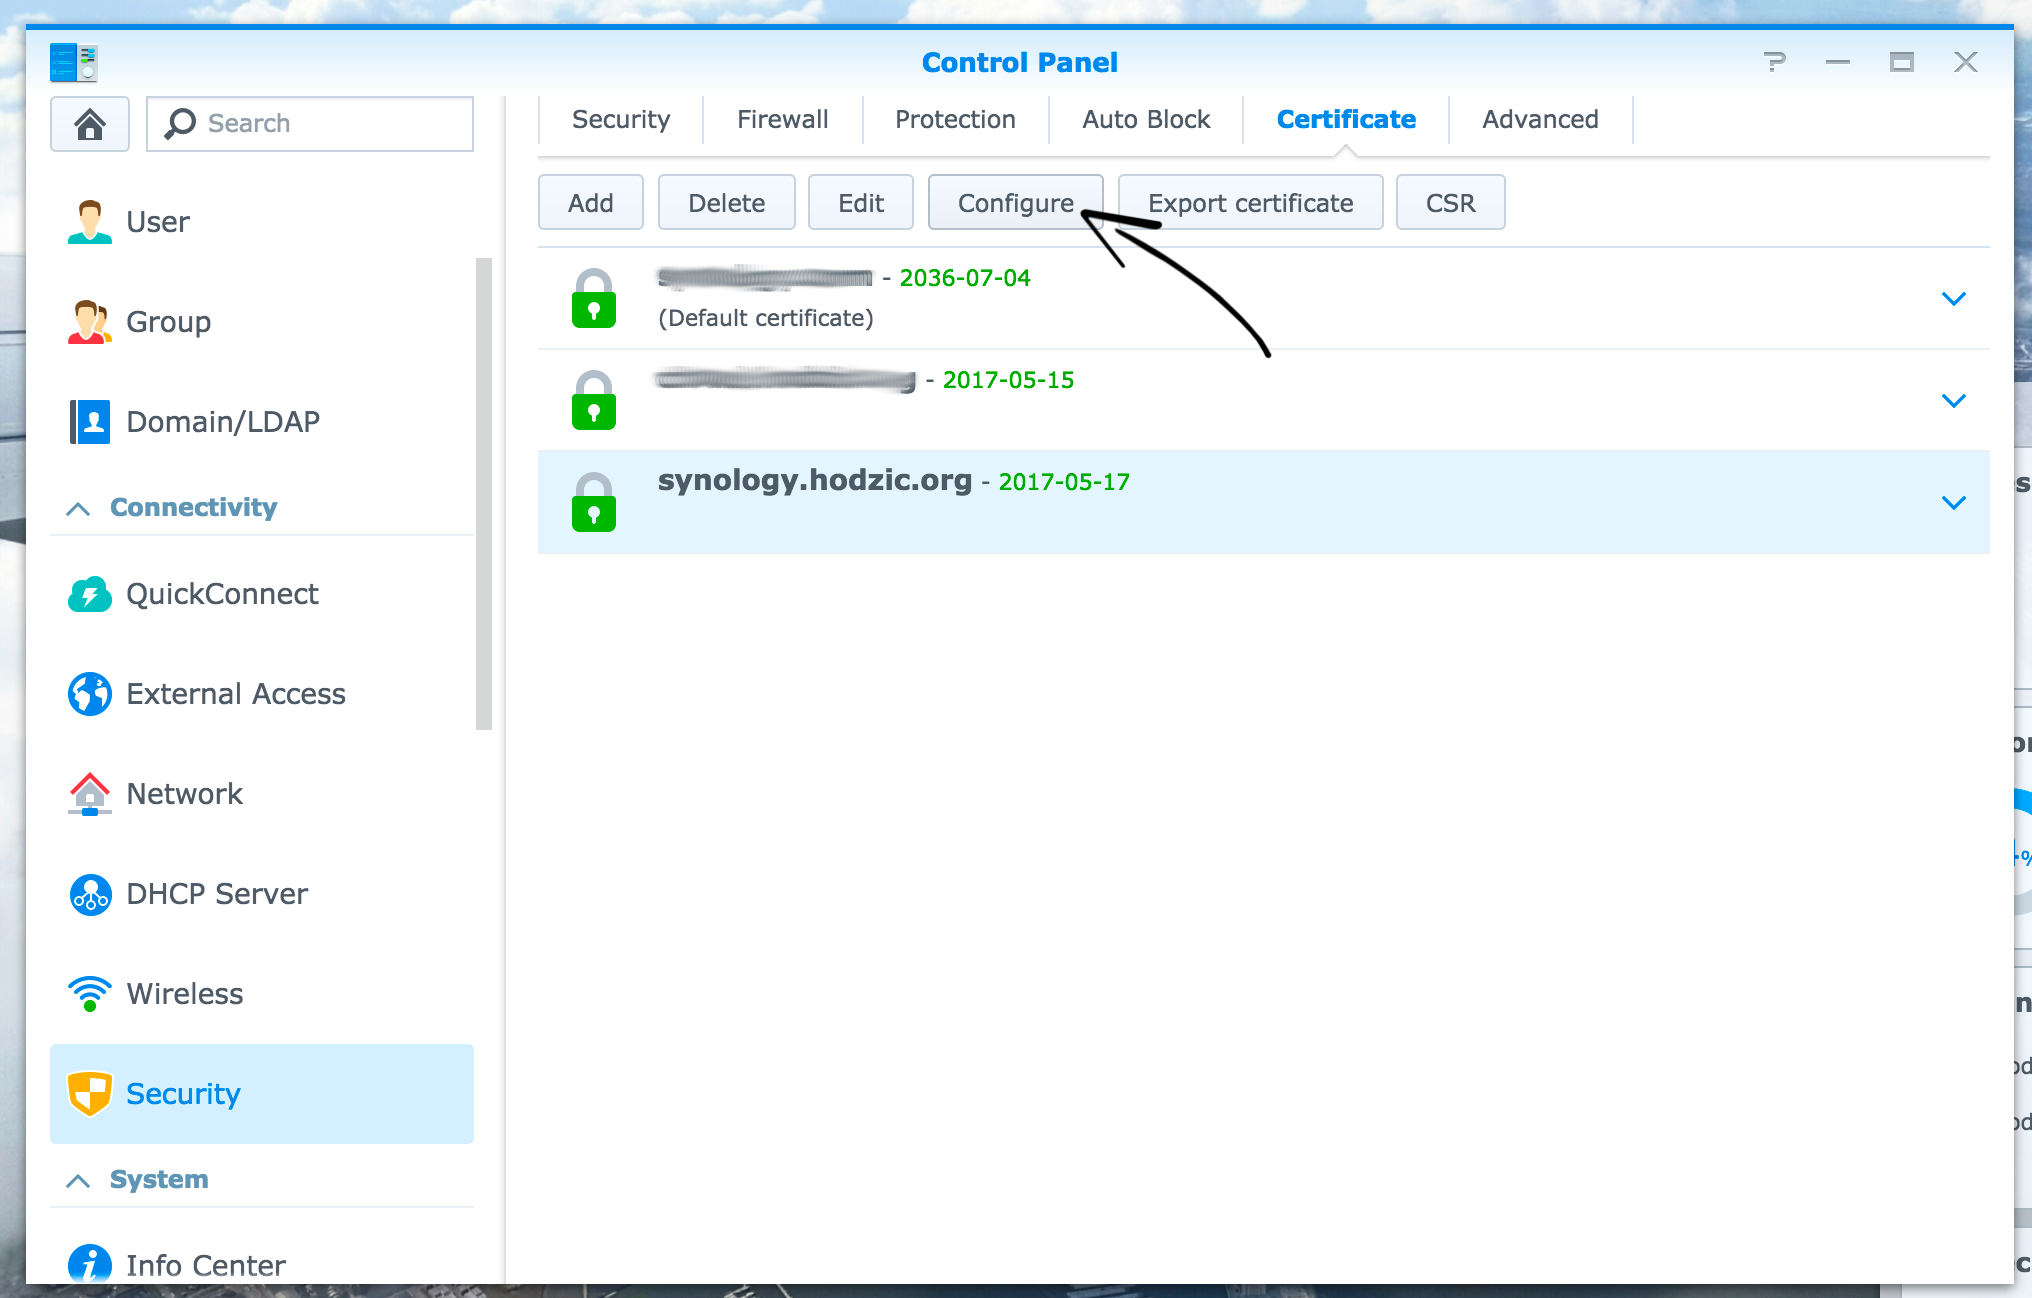
Finally, select newly generated Let’s Encrypt SSL/TLS certificate for your sub/domain and click Ok
After this, if you go to your sub/domain with https prefix (i.e: https://synology.hodzic.org) you’ll be greeted with secure page!

However, only problem is that if you go to http://synology.hodzic.org, you won’t be automatically redirected to https and you’ll be left on unsecure page.

5. Redirect All traffic from http to https
To resolve this problem, go to:
Control Panel > Network > DSM Settings and select Automatically redirect HTTP connections to HTTPS
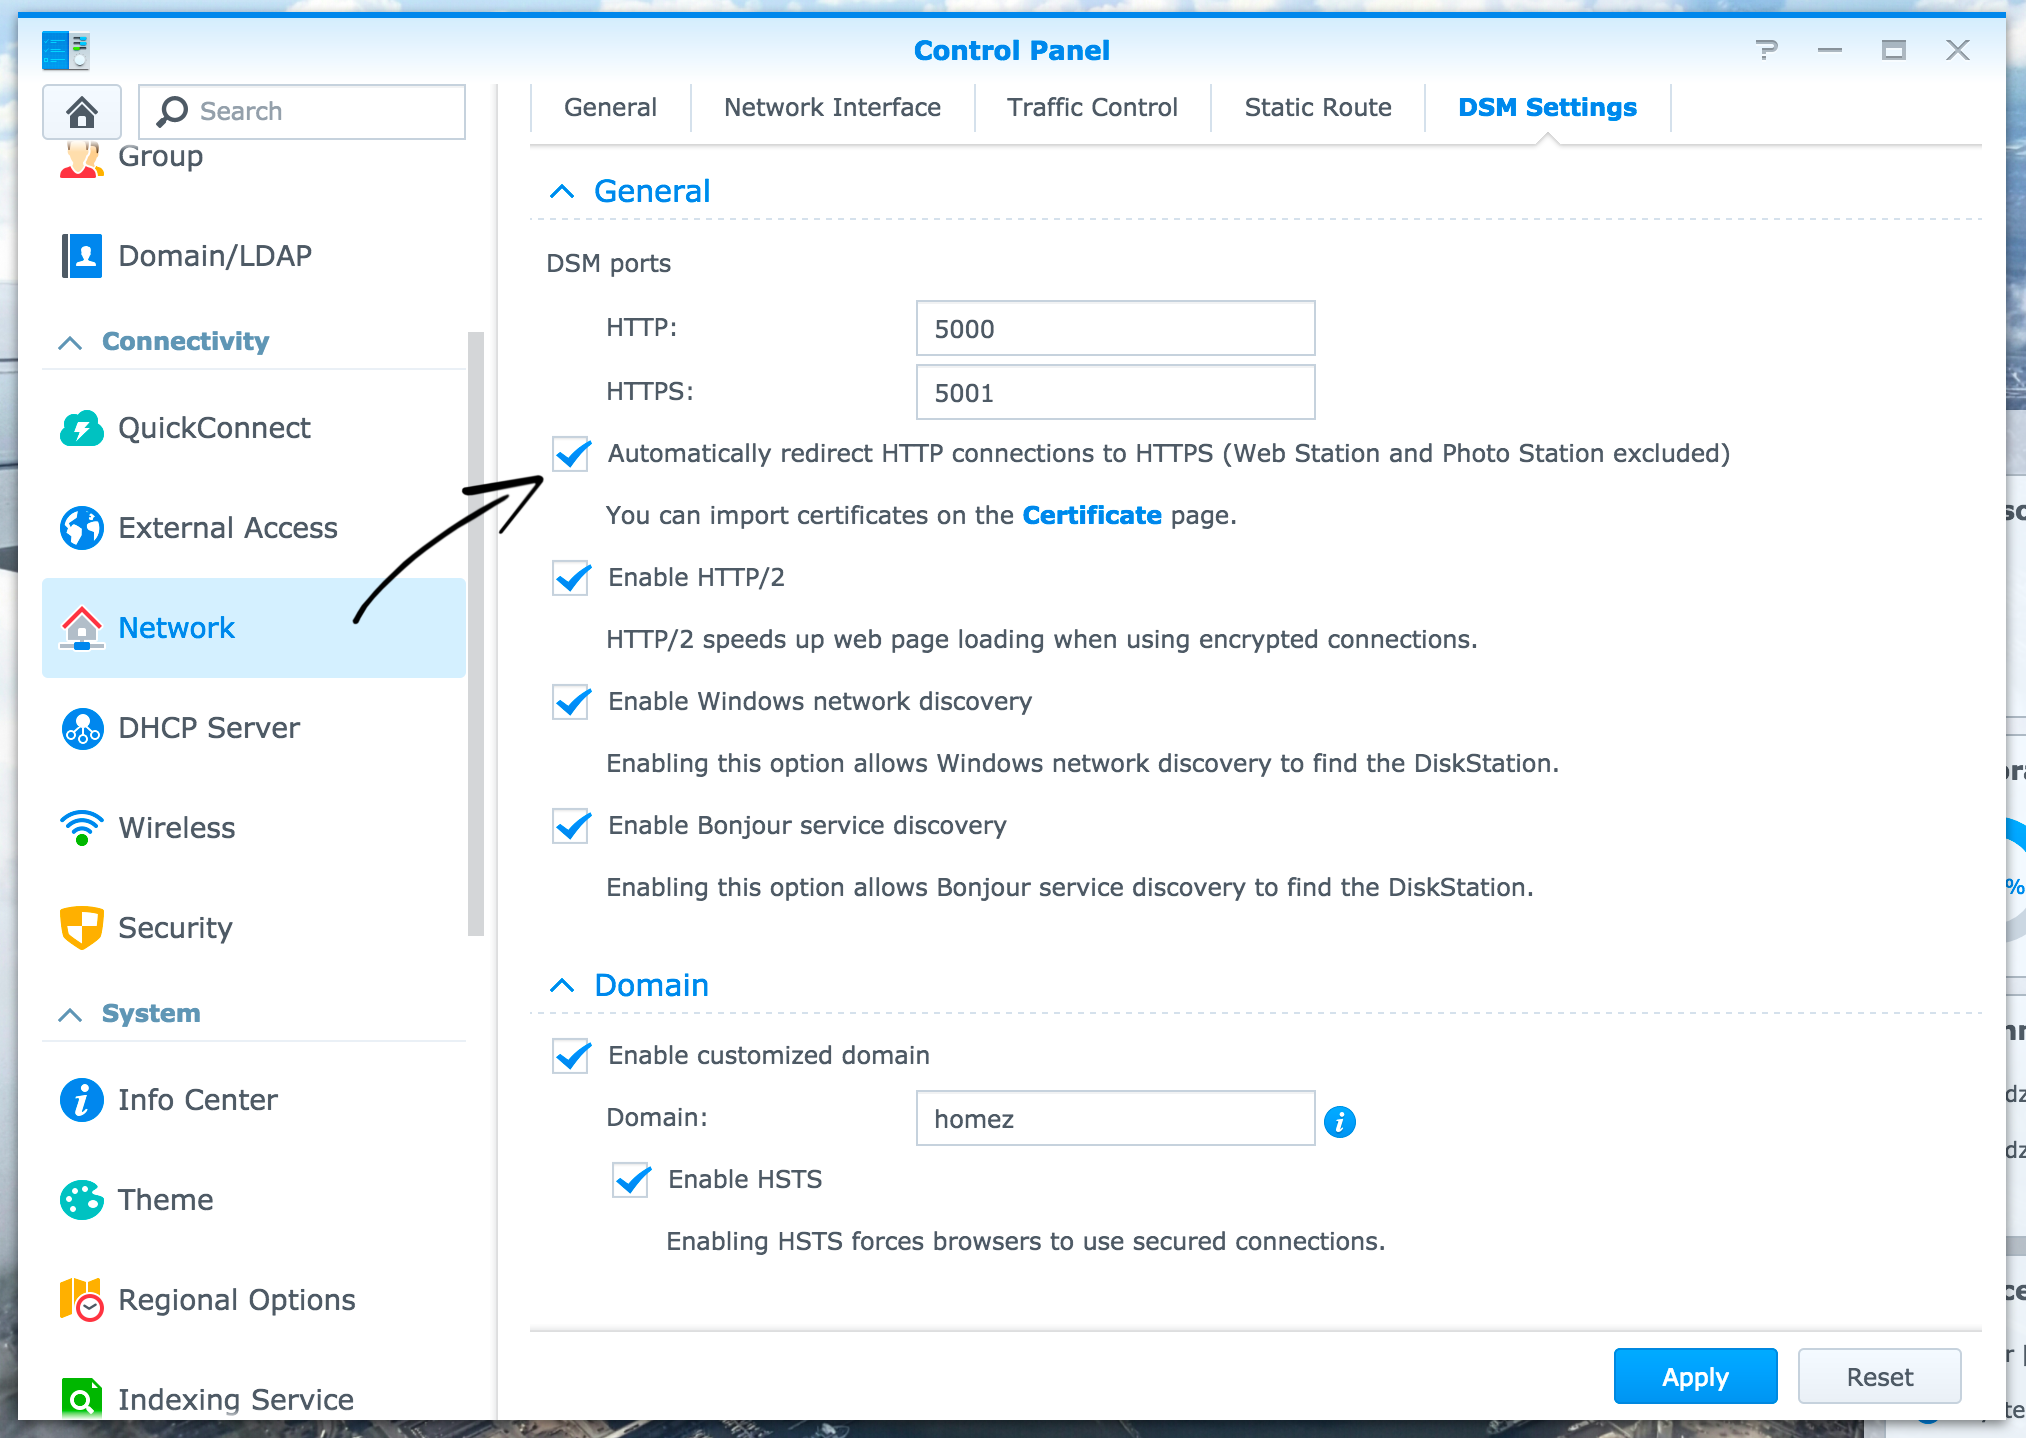
After which every http request will automatically redirect to https.
Recommendations:
- Change DSM ports from default 5000/5001 to something else
- Optionally you can also consider enabling following settings:
- Enable HTTP/2
- Enable HSTS
If you set “Subject Alternative Name” with your certificate, and want want to secure that URL with this same certificate. Don’t forget to set Reverse Proxy rules for that URL as well, and select correct certificate for that URL. Result:

Happy hacking & if you found this useful, consider becoming my GitHub sponsor!
Comments